TensorFlow Extended (TFX): the components and their functionalities
Mar 5, 2021
Never miss our publications about Open Source, big data and distributed systems, low frequency of one email every two months.
Putting Machine Learning (ML) and Deep Learning (DL) models in production certainly is a difficult task. It has been recognized as more failure-prone and time consuming than the modeling itself, yet it is the one generating the added value for a business. Moreover, once a model has been deployed, we need to maintain it. We must survey its performance, the quality of newly generated data, and the adequacy of the underlying infrastructure. When needed, the model should be retrained. The whole process must be automated, with as limited human interference as possible, to make it sustainable in the long run. On top of that, we need to make sure that the model we are serving is reliable, consistent, secure, potentially scalable, etc. To help organizations implement an industrial-grade end-to-end production system, Google publicly released in early 2019 its in-house platform TensorFlow Extended (TFX).
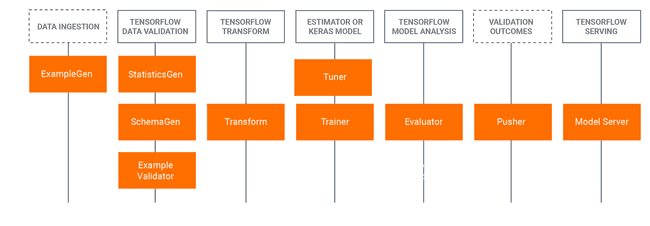
TensorFlow Extended is Google’s platform for producing and deploying ML models. It is designed to be a flexible and robust end-to-end ML platform. It is based on TensorFlow (TF) libraries, which are used to write user-defined functions in Python. For example, to train a model (which can be ML or DL), you need to build a TensorFlow Estimator or Keras model. Being familiar with those technologies is a prerequisite to benefit from TFX. The added value of TFX is packing the functionalities of TF libraries in the reusable building blocks, called standard components. They can be easily connected to create pipelines with minimal additional code. The illustration below shows the connection between the libraries and the derived components.
Standard components are connected sequentially to form a pipeline. One component’s output is another one’s input. They also pass on the information about the current state. Each run generates metadata, which is persisted into what is called the metadata store. Some components are essential, and some are not. For example, we can skip the data validation (StatisticsGen/SchemaGen/ExampleValidator block) and pass directly from the example generation (ExampleGen component) to feature engineering (Transform component). Further on, we will look at each component and its functionality individually, but now let’s continue with other important concepts that TFX builds upon.
First, let’s describe how a component is built. Each component has three main parts:
- driver: decides what needs to be done based on the metadata and coordinates the job execution
- executor: user-provided code to solve the task at hand
- publisher: takes the results of the executor and updates the metadata store.
The driver and the publisher are mostly the code that we don’t need to change if the standard functionality suffices. If we want to customize the executor, but we are keeping the inputs, outputs, and execution properties the same, we need only to extend the executor. For a completely different functionality, a fully customized executor can be written.
Most of the components run on Apache Beam, which provides a framework for running computations on different execution engines. It can be used for batch and streaming data processing. It assures portability and scalability.
The next important concept is the already mentioned metadata store. During the pipeline execution, the components estimate the state of the system by reading the information from the metadata store, which was produced by previous components. After a component is run, it writes its proper output to the metadata store. This information is called an artifact and it can be stored in any SQL-compatible database. Some examples of the artifacts:
- information about the models, the data they were trained on, and the evaluation metrics
- execution records for every component
- lineage of the data objects as they flow through the pipeline.
Having this information enables us to observe how the change in the data affects the change in the metrics. We leverage it for warm-start training and, in general, task-aware and data-aware pipeline architecture.
Let’s dive deeper into the individual standard components and illustrate their usage. Since TFX is only extending the existing TF ecosystem, you can also integrate TensorBoard for additional visualizations such as different KPIs where needed.
Setup
The environment
I run the project on Arch Linux, where I manage my virtual environments with Miniconda.
Before installing the libraries, verify the compatibility of the components here. Create a virtual environment with Python 3.7 and install TensorFlow, TensorFlow Extended, Jupyter notebook, and potentially any other dependencies that are missing or are incompatible.
$ conda --version
conda 4.9.1
$ conda create --name env_tfx python=3.7
$ conda activate env_tfx
(env_tfx)$ pip install tensorflow==2.3.0
(env_tfx)$ pip install tfx==0.24.1
(env_tfx)$ pip install notebook
The code
You can run the code from this notebook. Download it to your project directory. In my case, it is ./tfx. In the same directory create new folders: data, artifacts, and serving_model.
tfx
├── artifacts
├── data
└── serving_model
The dataset
We will be using the wine-quality.csv dataset coming from the MLflow git repository. The same dataset was used in my article Experiment tracking with MLflow on Databricks Community Edition.
To simplify the example, I deleted the quotes around the column names and replaced the whitespaces between the words with the underscore. You can download it here. Save it to your data folder.
Overview of the components with examples
Let’s define the paths to the root, the input data, artifact storage, and the storage for the final (blessed) version of the model. Adapt them accordingly to your system. To run the components interactively, we need to create an interactive context.
import os
_data_root = './data'
_data_filepath = os.path.join(_data_root, "wine-quality.csv")
_pipeline_root = './artifacts'
_serving_model_dir = './serving_model'

from tfx.orchestration.experimental.interactive.interactive_context import InteractiveContext
context = InteractiveContext(pipeline_root=_pipeline_root)
ExampleGen
The ExampleGen component creates a train/test split and ingests data into the pipeline. At the time of writing (February 2021), the fully supported data sources and formats are CSV, tf.Record and BigQuery. Besides, custom executors are available for Avro and Parquet and a custom component for Presto. Before splitting, it shuffles the dataset to eliminate the bias based on ordering.
from tfx.components.example_gen.csv_example_gen.component import CsvExampleGen

example_gen = CsvExampleGen(input_base=_data_root)
context.run(example_gen)
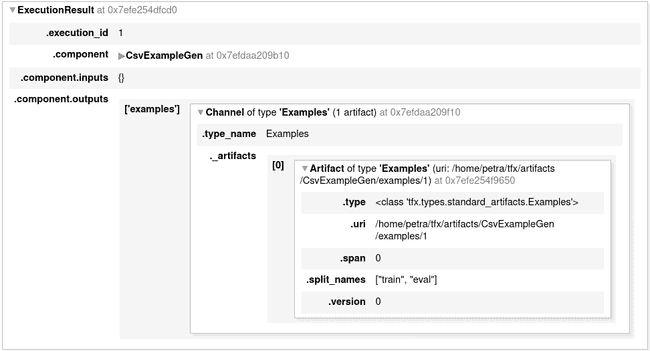
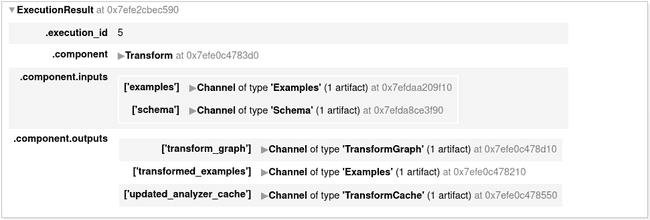
After the run (not only for this component but also for others), a report with some execution details is displayed. This shows you what kind of outputs were generated.
You can explore the information about them by printing it out.
example_gen.outputs['examples'].get()Or, you can go to the artifact URI and see the created objects.
(env_tfx) ➜  ~$ tree /home/petra/tfx/artifacts/CsvExampleGen/examples/1
/home/petra/tfx/artifacts/CsvExampleGen/examples/1
├── eval
│   └── data_tfrecord-00000-of-00001.gz
└── train
    └── data_tfrecord-00000-of-00001.gz
StatisticsGen
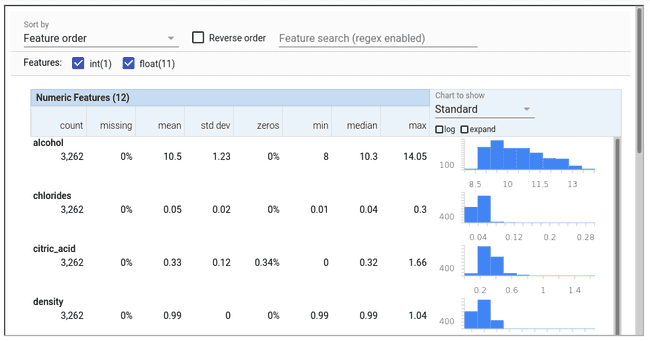
The StatisticsGen component generates the feature statistics on the training and test data, coming from the ExampleGen. We can visualize and compare the properties of train and test split and evaluate, for example, if the distributions of variables are the same. It is based on the TensorFlow Data Validation library, which can be used independently or in conjunction with pandas data frames.
from tfx.components.statistics_gen.component import StatisticsGen

statistics_gen = StatisticsGen(
    examples=example_gen.outputs['examples'])
context.run(statistics_gen)

# Visualize the results
context.show(statistics_gen.outputs['statistics'])
Below is an example of the StatisticsGen output on the test set, displaying the distributions of the variables.
SchemaGen
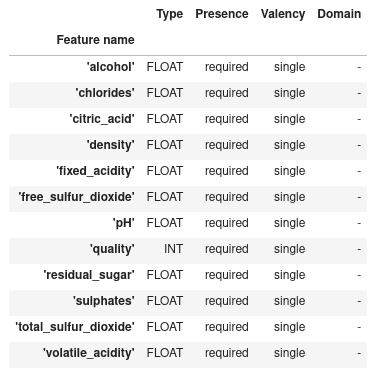
The SchemaGen component performs one pass over the training and test data to infer types, categories, and ranges.
from tfx.components.schema_gen.component import SchemaGen

infer_schema = SchemaGen(statistics=statistics_gen.outputs['statistics'])
context.run(infer_schema)

# Display schema
context.show(infer_schema.outputs['schema'])
ExampleValidator
The ExampleValidator component uses previously generated statistics and schema as inputs. It compares the properties of the train and the test data and evaluates if there are any differences (anomalies). An example of such anomaly are rare categories, which are present in only one of the datasets after the split. It also checks the training-serving skew and data drift.
from tfx.components.example_validator.component import ExampleValidator

validate_stats = ExampleValidator(
    statistics=statistics_gen.outputs['statistics'],
    schema=infer_schema.outputs['schema'])
context.run(validate_stats)

# Display differences between the train/test split
context.show(validate_stats.outputs['anomalies'])
In our case, the Validator doesn’t detect any difference between the splits. When it does, we can list and inspect it.
Transform
The Transform component performs feature engineering. For example, it generates vocabularies, enriches text features, normalizes or standardizes values, or converts continuous features into categorical ones. One of the arguments is module_file. This is the file containing the user-defined functions for the data transformations. All complex components use this logic to separate the configuration of the component itself from the processing logic.
We create two files:
wine_quality_constants.pygroups together the variables that will be processed the same way (e.g. the group of variables that will be normalized, the ones that will be one-hot encoded…)wine_quality_transform.pycontains the transformation functions.
This will prove handy later since we will reuse the variable definitions during the training.
_constants_module_file = 'wine_quality_constants.py'%%writefile {_constants_module_file}
# We only have floating-point features and all will be processed the same way
DENSE_FLOAT_FEATURE_KEYS = ['alcohol', 'chlorides', 'citric_acid', 'density', 'fixed_acidity',
'free_sulfur_dioxide', 'pH', 'residual_sugar', 'sulphates', 'total_sulfur_dioxide', 'volatile_acidity']
# Label column
LABEL_KEY = 'quality'
def transformed_name(key):
"""Create new name of the variable after the transformation. """
return key + '_xf'_transform_module_file = 'wine_quality_transform.py'%%writefile {_transform_module_file}
import tensorflow as tf
import tensorflow_transform as tft
from wine_quality_constants import *
def preprocessing_fn(inputs):
"""Callback function for preprocessing inputs."""
outputs = inputs.copy()
# Transform LABEL_KEY to dense tensor
outputs[transformed_name(LABEL_KEY)] = fill_in_missing(inputs[LABEL_KEY])
# Standardize all the features (this is just to illustrate the functionality. Since we are using CART, standardization will not influence the performance of the model.)
for key in DENSE_FLOAT_FEATURE_KEYS:
outputs[transformed_name(key)] = tft.scale_to_z_score(fill_in_missing(inputs[key]))
return outputs
def fill_in_missing(x):
"""Replace missing values with 0 in a SparseTensor and convert to a dense tensor."""
default_value = 0
return tf.squeeze(
tf.sparse.to_dense(
tf.SparseTensor(x.indices, x.values, [x.dense_shape[0], 1]),
default_value),
axis=1)Run the Transform, specifying the file containing the processing logic with the module_file property.
from tfx.components.transform.component import Transform

transform = Transform(
    examples=example_gen.outputs['examples'],
    schema=infer_schema.outputs['schema'],
    module_file=_transform_module_file)
context.run(transform)
In addition to the transformed data, the transformation graph is being computed and saved. This assures that the same transformations are applied during serving as they were during training.
Trainer
The Trainer component prepares the input data and trains the model. It requires the examples from ExampleGen, the schema from SchemaGen, and the code for the training. Optionally, it receives hyperparameters from Tuner (not shown in this article) or a set of parameters from another pre-trained model (warm-start). The training code can be based on TensorFlow Estimators, Keras models, or custom training loops.
Implementing a Trainer involves more custom code than other components. It needs to handle all the input pipelines together with the training logic. Separating those two processes give us flexibility with data preparation. We independently preprocess the data coming from different sources or being used in different steps (e.g. training and inference), before feeding them to the estimator.
_trainer_module_file = 'wine_quality_trainer.py'%%writefile {_trainer_module_file}
import tensorflow as tf
import tensorflow_model_analysis as tfma
import tensorflow_transform as tft
from tensorflow_transform.tf_metadata import schema_utils
from tfx_bsl.tfxio import dataset_options
from wine_quality_constants import *
# PREPARE FEATURES AND DEFINE THE ESTIMATOR
def _transformed_names(keys):
return [transformed_name(key) for key in keys]
# Specification of the schema to parse the data into tensors
def _get_raw_feature_spec(schema):
return schema_utils.schema_as_feature_spec(schema).feature_spec
# Define the estimator
def _build_estimator(config, n_batches_per_layer=1, n_trees=100,
max_depth=4, learning_rate=0.02):
"""Build a Boosted Trees Regressor for predicting the wine quality."""
features = [
tf.feature_column.numeric_column(key, shape=())
for key in _transformed_names(DENSE_FLOAT_FEATURE_KEYS)
]
# Regression tree with pre-defined mean squared error loss
return tf.estimator.BoostedTreesRegressor(
config=config,
feature_columns=features,
n_batches_per_layer=n_batches_per_layer,
n_trees=n_trees,
max_depth=max_depth,
learning_rate=learning_rate)
# INPUT PIPELINE
def _example_serving_receiver_fn(tf_transform_graph, schema):
"""Build the inputs for serving (inference)."""
# Get feature specifications and remove the label
raw_feature_spec = _get_raw_feature_spec(schema)
raw_feature_spec.pop(LABEL_KEY)
# Parses the tf.Example according to the provided feature_spec.
# Returns all parsed Tensors as features.
raw_input_fn = tf.estimator.export.build_parsing_serving_input_receiver_fn(
raw_feature_spec, default_batch_size=None)
serving_input_receiver = raw_input_fn()
# Transform the features according to the transform_graph.
transformed_features = tf_transform_graph.transform_raw_features(
serving_input_receiver.features)
return tf.estimator.export.ServingInputReceiver(
transformed_features, serving_input_receiver.receiver_tensors)
def _eval_input_receiver_fn(tf_transform_graph, schema):
"""Build everything needed for the tf-model-analysis to run the model."""
# Notice that the inputs are raw features, not transformed features here.
raw_feature_spec = _get_raw_feature_spec(schema)
serialized_tf_example = tf.compat.v1.placeholder(
dtype=tf.string, shape=[None], name='input_example_tensor')
# Add a parse_example operator to the tensorflow graph, which will parse
# raw, untransformed, tf examples.
features = tf.io.parse_example(serialized_tf_example, raw_feature_spec)
# Now that we have our raw examples, process them through the Transform
# function computed during the preprocessing step.
transformed_features = tf_transform_graph.transform_raw_features(
features)
# The key name MUST be 'examples'.
receiver_tensors = {'examples': serialized_tf_example}
features.update(transformed_features)
return tfma.export.EvalInputReceiver(
features=features,
receiver_tensors=receiver_tensors,
labels=transformed_features[transformed_name(LABEL_KEY)])
def _input_fn(file_pattern, data_accessor, tf_transform_output, batch_size=200):
"""Generates features and label for training and evaluation."""
return data_accessor.tf_dataset_factory(
file_pattern,
dataset_options.TensorFlowDatasetOptions(
batch_size=batch_size, label_key=transformed_name(LABEL_KEY)),
tf_transform_output.transformed_metadata.schema)
# HERE IT ALL COMES TOGETHER: TFX will call this function (it MUST be named trainer_fn)
def trainer_fn(trainer_fn_args, schema):
"""Build the estimator using the high-level API."""
# Model parameters
train_batch_size = 1000
eval_batch_size = 1000
n_trees=100
max_depth=5
learning_rate=0.05
# Input logic for each step
tf_transform_graph = tft.TFTransformOutput(trainer_fn_args.transform_output)
train_input_fn = lambda: _input_fn(
trainer_fn_args.train_files,
trainer_fn_args.data_accessor,
tf_transform_graph,
batch_size=train_batch_size)
eval_input_fn = lambda: _input_fn(
trainer_fn_args.eval_files,
trainer_fn_args.data_accessor,
tf_transform_graph,
batch_size=eval_batch_size)
# Configuration for the "train" part for the train_and_evaluate call.
train_spec = tf.estimator.TrainSpec(
train_input_fn,
max_steps=trainer_fn_args.train_steps)
serving_receiver_fn = lambda: _example_serving_receiver_fn(
tf_transform_graph, schema)
exporter = tf.estimator.FinalExporter('wine-quality', serving_receiver_fn)
# Configuration for the "eval" part for the train_and_evaluate call.
# Combines details of evaluation of the trained model as well as its export.
eval_spec = tf.estimator.EvalSpec(
eval_input_fn,
steps=trainer_fn_args.eval_steps,
exporters=[exporter],
name='wine-quaity-eval')
run_config = tf.estimator.RunConfig(
save_checkpoints_steps=999, keep_checkpoint_max=1)
run_config = run_config.replace(model_dir=trainer_fn_args.serving_model_dir)
# The model
estimator = _build_estimator(config=run_config,
n_trees=n_trees,
max_depth=max_depth,
learning_rate=learning_rate)
# Create an input receiver for TFMA (model analysis) processing
receiver_fn = lambda: _eval_input_receiver_fn(
tf_transform_graph, schema)
return {
'estimator': estimator,
'train_spec': train_spec,
'eval_spec': eval_spec,
'eval_input_receiver_fn': receiver_fn
}Now we are ready to train the model.
from tfx.components.trainer.component import Trainer
from tfx.proto import trainer_pb2

trainer = Trainer(
    module_file=_trainer_module_file,
    transformed_examples=transform.outputs['transformed_examples'],
    schema=infer_schema.outputs['schema'],
    transform_graph=transform.outputs['transform_graph'],
    train_args=trainer_pb2.TrainArgs(num_steps=800),
    eval_args=trainer_pb2.EvalArgs(num_steps=100))
context.run(trainer)
Evaluator
The Evaluator component analyses the model and helps us understand how the model performed. Through statistical metrics (e.g. AUC) it compares its performance against the performance of the reference model (e.g. the one in production). Or, as in this example, it compares to the fixed threshold of one or multiple metrics. If the new model satisfies the condition, it receives a tag ‘blessed’. This is a signal to Pusher that it is ready to be pushed to a specified location.
In evaluation configuration, we define what kind of model we are evaluating (e.g. serving, EvalSavedModel), the metrics and conditions, and on which part (slice) of the dataset it will be evaluated.
from tfx.types import Channel
from tfx.types.standard_artifacts import Model
from tfx.types.standard_artifacts import ModelBlessing
from tfx.components.evaluator.component import Evaluator
import tensorflow_model_analysis as tfma

eval_config = tfma.EvalConfig(
    model_specs=[
        # We are using estimator based EvalSavedModel: signature_name='eval'.
        tfma.ModelSpec(signature_name='eval')
    ],
    metrics_specs=[
        tfma.MetricsSpec(
            # The metrics added here are in addition to those saved with the model.
            # The condition for a blessing is R2 > 0.3.
            metrics=[
                tfma.MetricConfig(
                    class_name='SquaredPearsonCorrelation',
                    threshold=tfma.MetricThreshold(
                        value_threshold=tfma.GenericValueThreshold(
                            lower_bound={'value': 0.3})
                    ))]
                )],
    slicing_specs=[
        # An empty slice spec means the overall slice, i.e. the whole dataset.
        tfma.SlicingSpec()
    ])

evaluator = Evaluator(
    examples=example_gen.outputs['examples'],
    model=trainer.outputs['model'],
    eval_config=eval_config)
context.run(evaluator)
In the outputs of evaluator.outputs, we see that this model was blessed, so it will be pushed to a proper location by the Pusher component.
custom_properties {
  key: "blessed"
  value {
    int_value: 1
  }
}
Pusher
The Pusher component verifies the blessing from the Evaluator component and optionally the InfraValidator component. It assesses the compatibility between the model and the model server binary. This prevents technically weak models to be pushed to production. If the results are satisfactory, the model is pushed to one or more deployment targets. The deployment target can be:
- TensorFlow Serving - high-performance system for production environments
- TensorFlow Lite - for mobile and IoT applications
- TensorFlow JS - deploying the models in the browser and on Node.js.
If we don’t want to deploy, we can save the model to TensorFlow Hub, a repository of trained Machine Learning models, or just to the local file system.
from tfx.components.pusher.component import Pusher
from tfx.proto import pusher_pb2

pusher = Pusher(
    model=trainer.outputs['model'],
    model_blessing=evaluator.outputs['blessing'],
    push_destination=pusher_pb2.PushDestination(
        filesystem=pusher_pb2.PushDestination.Filesystem(
            base_directory=_serving_model_dir)))
context.run(pusher)
Go to the designated directory to verify that the model is there.
(env_tfx) ➜  serving_model$ tree
.
├── 1610060570
│   ├── saved_model.pb
│   └── variables
│       ├── variables.data-00000-of-00001
│       └── variables.index
Conclusion
In this article, we looked at the most important concepts and basic functionalities of TensorFlow Extended and we created our first pipeline. But there is much more to be discovered. We can build custom components, schedule, and run the pipelines with Airflow, Kubeflow, or Beam. Since it is built on TensorFlow, which is available since 2015 and very popular, it has a community of users with a low entry barrier. However, where TensorFlow is not the primary framework, it might be of limited interest. The learning curve is steep and the ingestion pipelines are not always intuitive. This isn’t surprising, since it was designed to facilitate Google’s workflow and with their specific problems in mind. TFX could be considered as a specialized product, destined for advanced TensorFlow users.
References
- TensorFlow Extended official website
- Article: TensorFlow Extended (TFX): Real World Machine Learning in Production
- Research article: TFX: A TensorFlow-Based Production-Scale Machine Learning Platform
- Article: Towards ML Engineering: A Brief History Of TensorFlow Extended (TFX)
- Colab example: taxi pipeline
- Colab example: components
- Colab example: online news popularity pipeline
