


CDP part 2: CDP Public Cloud deployment on AWS

Jun 19, 2023
Never miss our publications about Open Source, big data and distributed systems, low frequency of one email every two months.
The Cloudera Data Platform (CDP) Public Cloud provides the foundation upon which full featured data lakes are created.
In a previous article, we introduced the CDP platform. This article is the second in a series of six to learn how to build end-to-end big data architectures with CDP:
- CDP part 1: introduction to end-to-end data lakehouse architecture with CDP
- CDP part 2: CDP Public Cloud deployment on AWS
- CDP part 3: Data Services activation on CDP Public Cloud environment
- CDP part 4: user management on CDP Public Cloud with Keycloak
- CDP part 5: user permission management on CDP Public Cloud
- CDP part 6: end-to-end data lakehouse usecase with CDP
More specifically, we are going to:
- Create a credential that permits CDP to manage resources on AWS
- Configure an AWS CloudFormation stack that serves as root of our deployment
- Deploy a CDP Environment including a Data Lake to AWS
The configuration and deployment can be accomplished via the web interfaces of Cloudera and Amazon - generally referred to as the AWS console or the CDP console - or via their respective CLI tools. We cover both approaches. First, we demonstrate how to perform all preparatory steps and the actual deployment via the consoles. Second, we provide the console commands to perform the same tasks from a terminal using the CLI tools.
Before we begin, a couple of important remarks:
-
This deployment is based on the AWS quickstart documentation by Cloudera and aims to provide a useable environment as quickly as possible. It is not optimized for production use, and it is also not suitable for use cases in which you want to use existing infrastructure components - such as VPCs and subnet groups - instead of CDP-managed ones.
-
If you decide to follow along, be aware that CDP creates resources on your AWS account that incur costs. You find a list of resources that are created during this deployment and a ballpark estimate of the associated costs at the end of the article. Always make sure to delete cloud resources that are no longer in use to avoid unwanted costs.
With that said, let’s begin by configuring our CDP and AWS accounts. As a reminder, you need at least Power User privileges on CDP and Administrator access on AWS to follow along.
Deploy using the CDP and AWS Web Interfaces
This approach is recommended if you are new to CDP and/or AWS. It is slower but gives you a better idea of the various steps involved in the deployment process. If you did not install and configure the CDP CLI and the AWS CLI as described in the first part of the series, this is also your only option.
If you want to go faster and use the terminal to manage your deployment, scroll down to the Deploy from the Terminal section. Note that you still have to use the CDP console to create your CDP credential. We recommend you to follow the below steps until the point where you copy your Cross-account access role Amazon Resource Name (ARN).
Create a CDP Credential
CDP Public Cloud creates and manages AWS resources on your behalf. It is therefore necessary to delegate access to your AWS account via a cross-account access role. Our first step is to create this role for your AWS account and store it in your CDP account as credential.
-
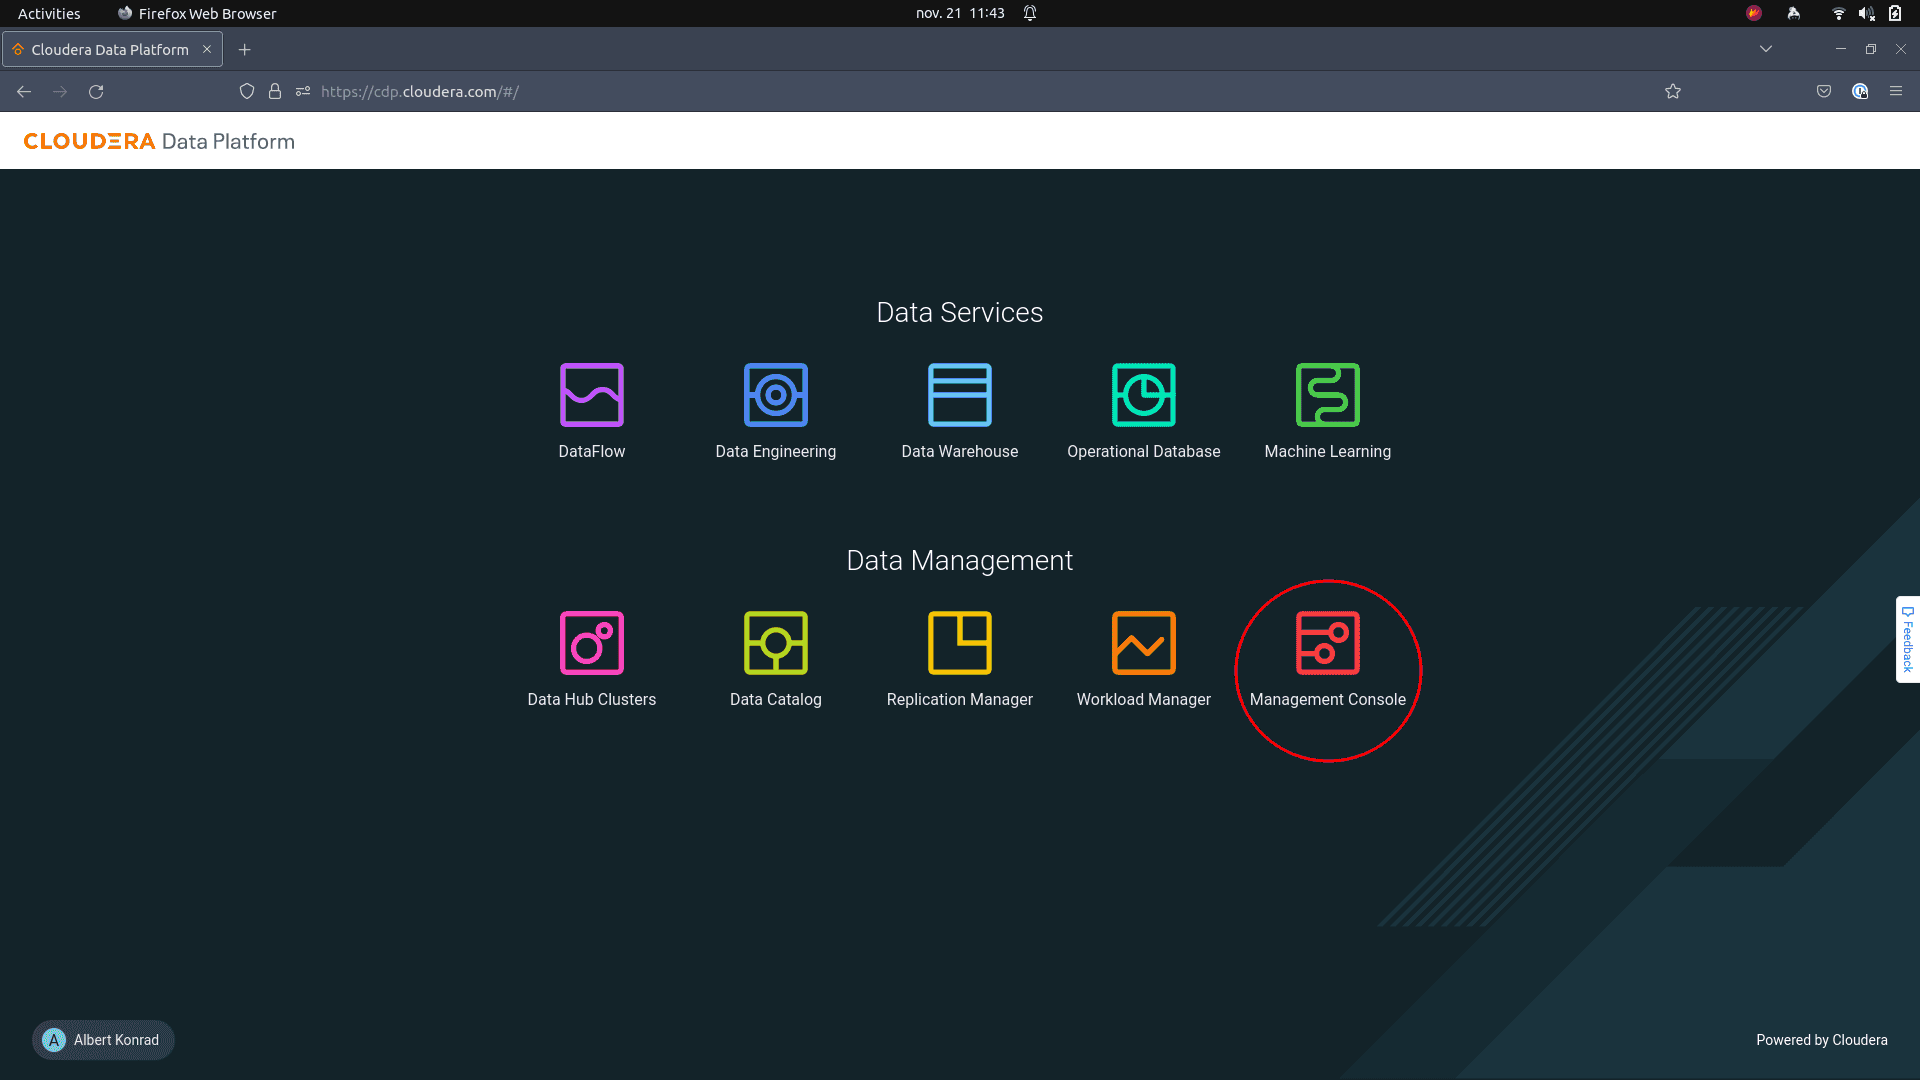
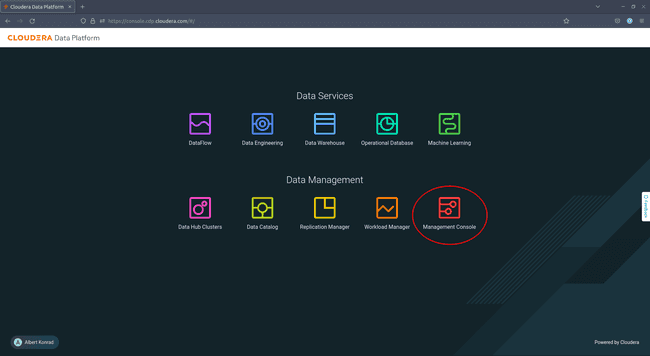
To begin, log in to the Cloudera console and access the Management Console:

-
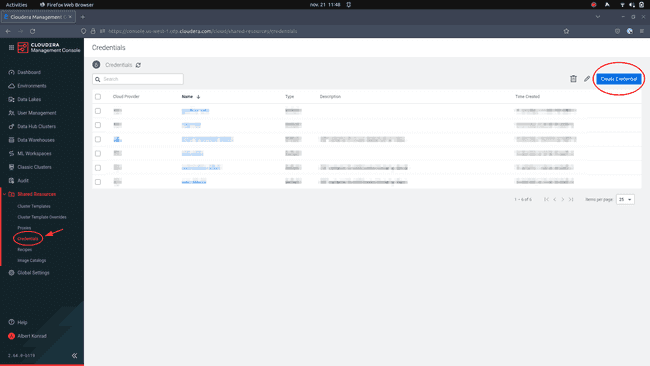
Navigate to Shared Resources > Credentials and click on Create Credential on the top right:
-
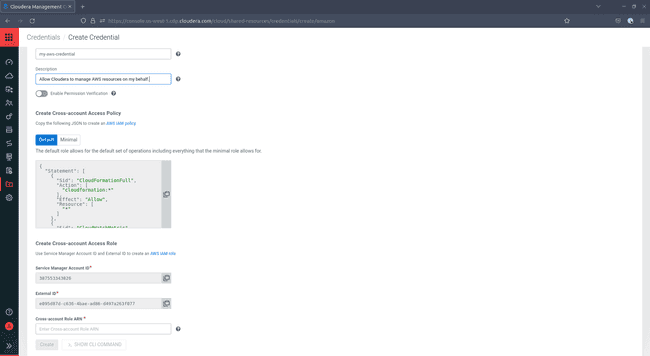
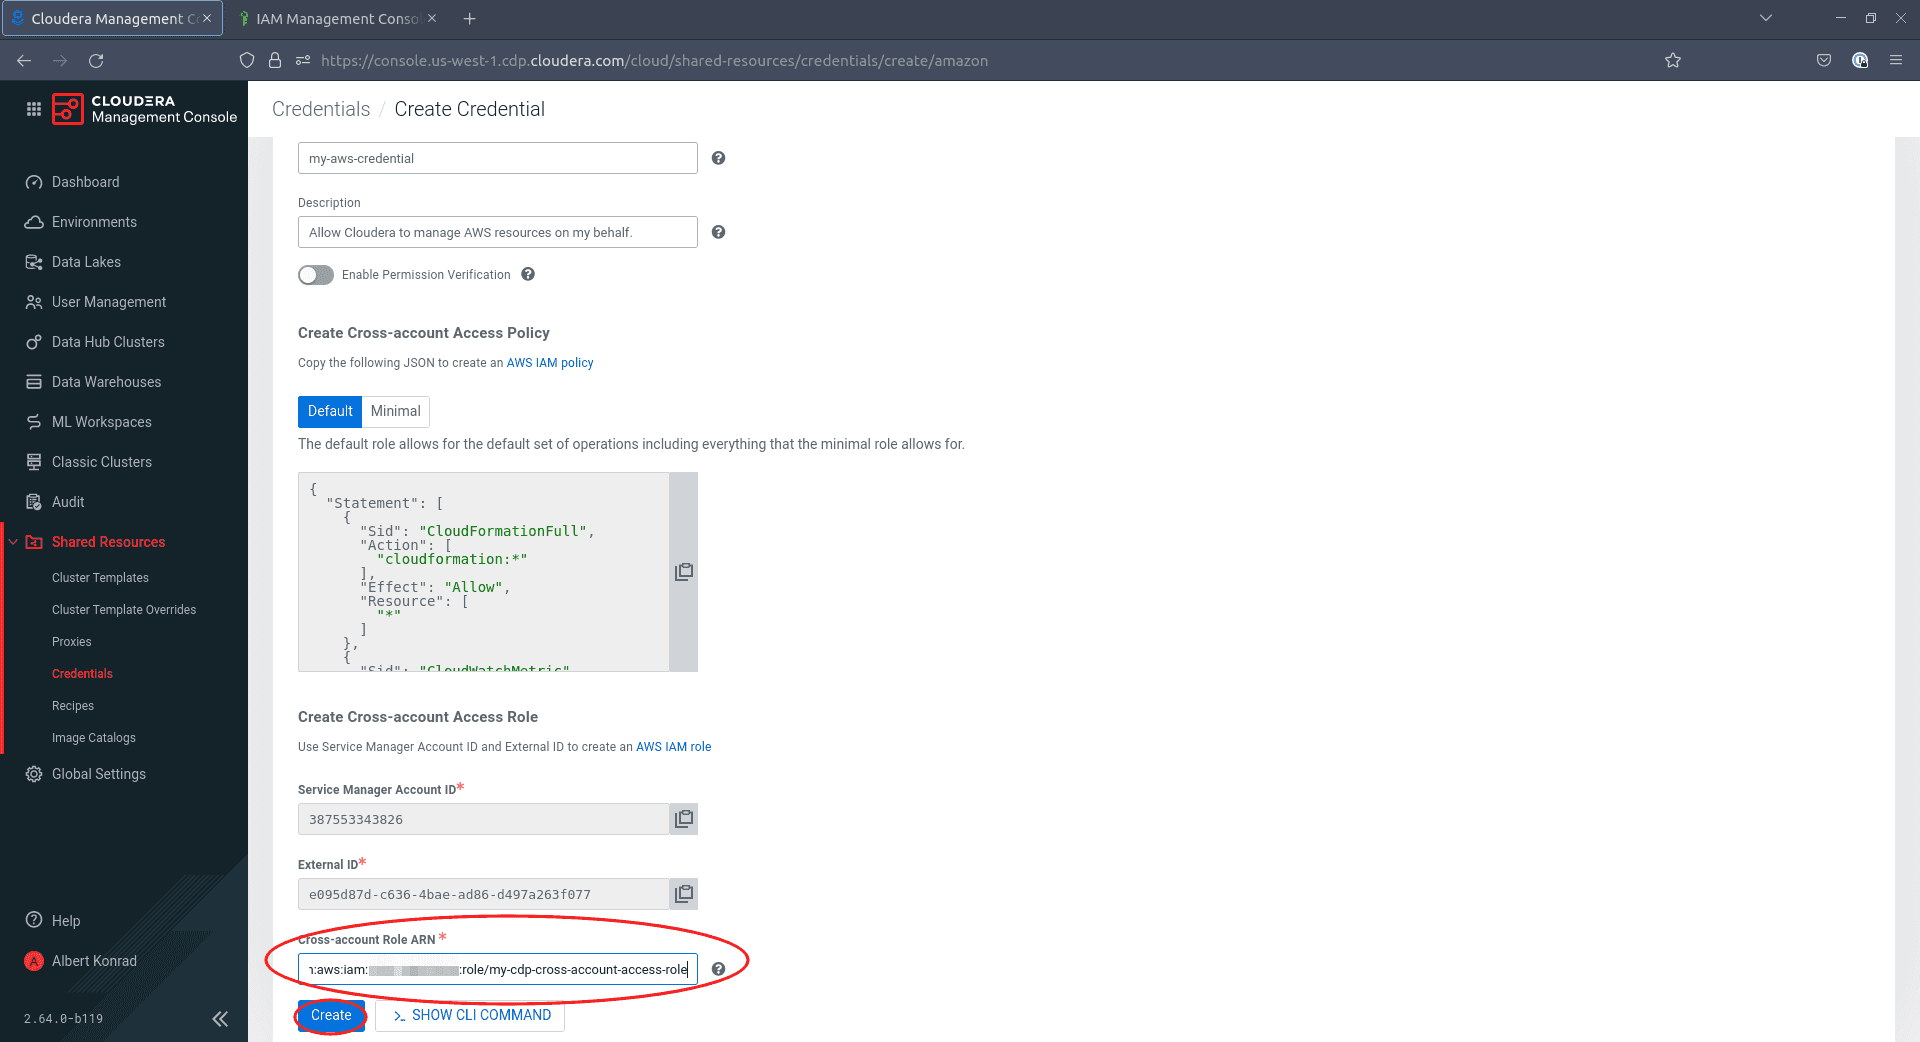
In the Create Credential menu, select AWS, then enter a name and optionally a description for your credential. This name and description are used on the CDP-side of your architecture.
-
Copy the AWS IAM policy that is available under Create Cross-account Access Policy. Be sure to select the version with
Defaultpermissions, not the one withMinimalpermissions. -
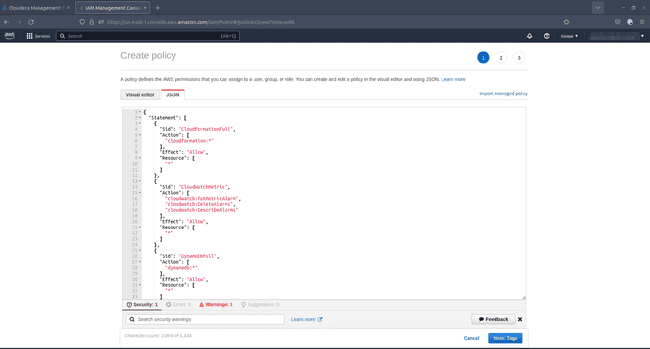
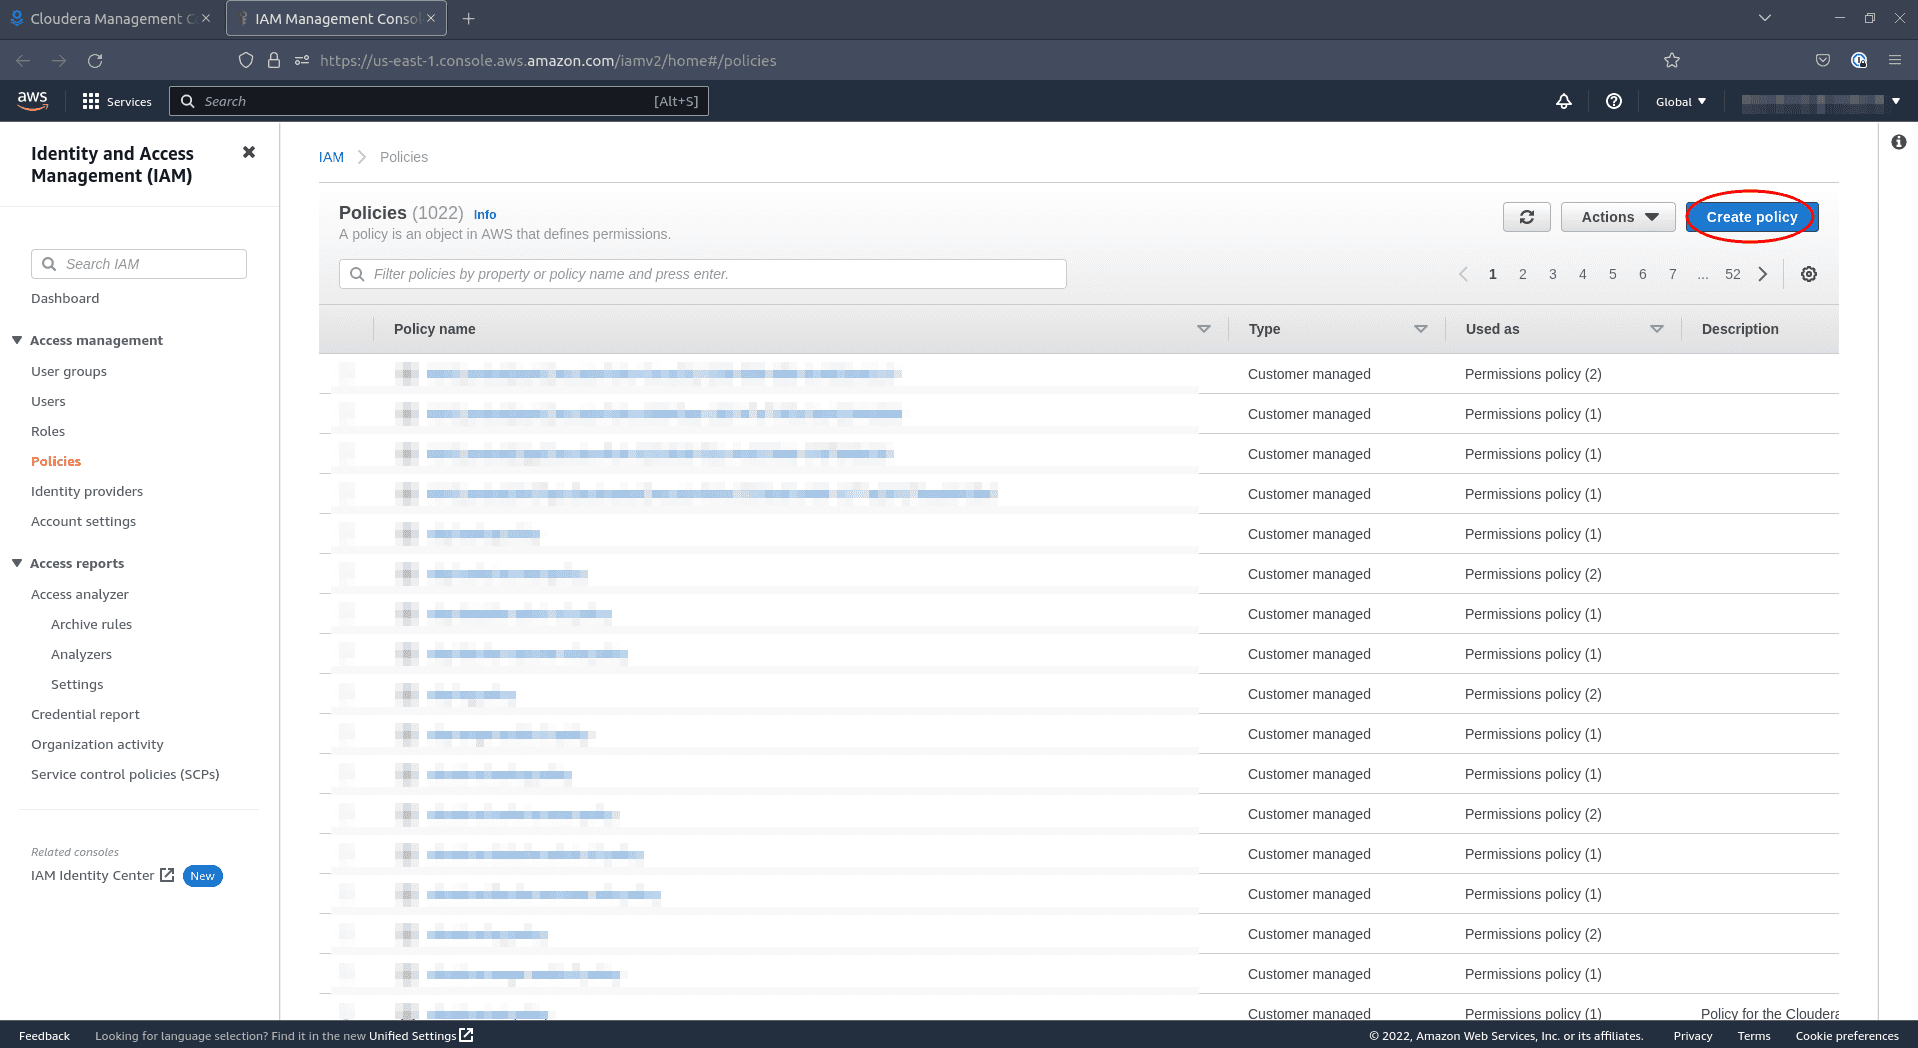
In a new browser tab, navigate to Identity and Access Management (IAM) - Policies in your AWS Console and click Create Policy.

-
Paste the policy document you have copied from the CDP console:
-
Click Next, optionally add tags and click Next again:
-
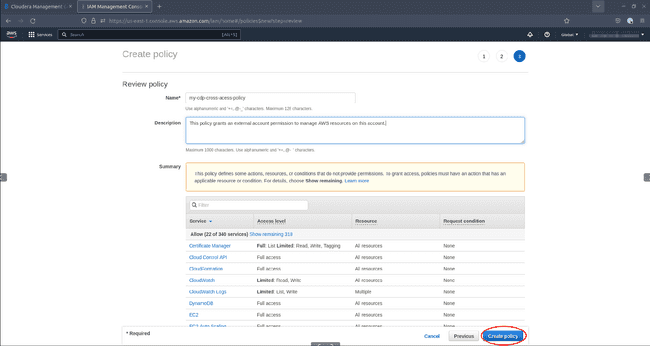
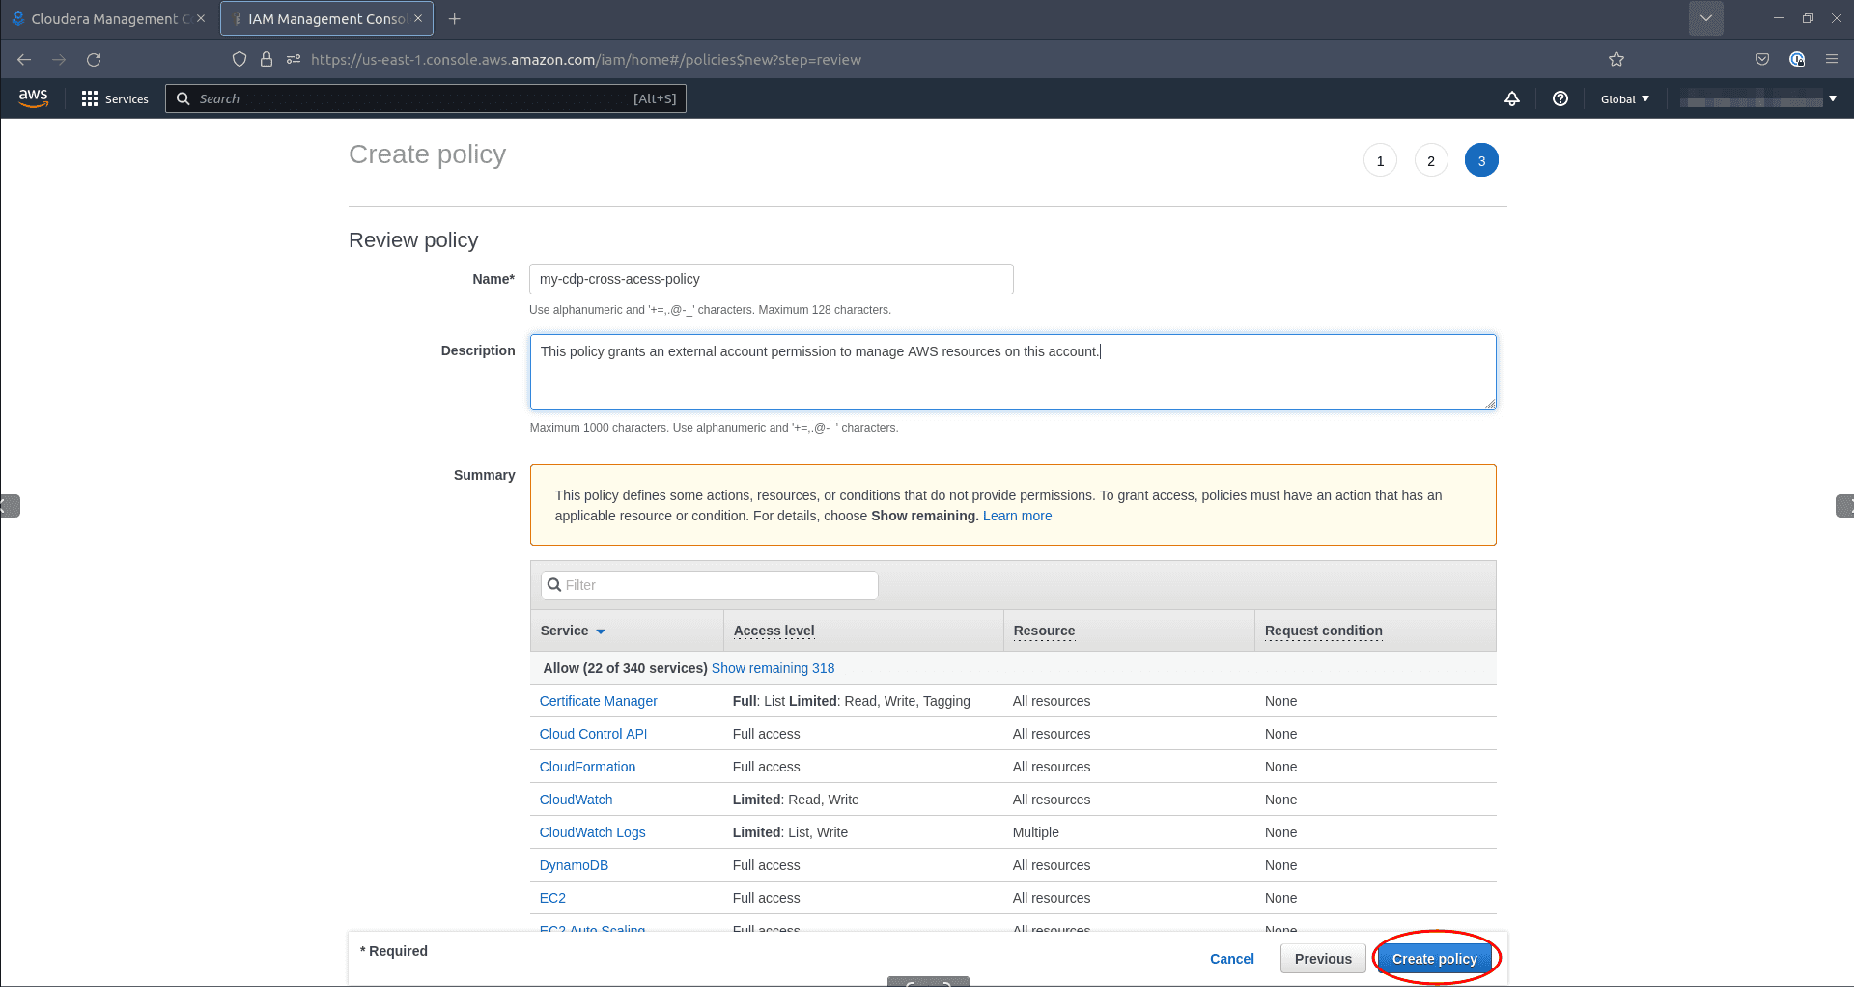
Review the policy document, provide a name and an optional description. AWS displays a warning message that you may ignore. Click Create policy.
-
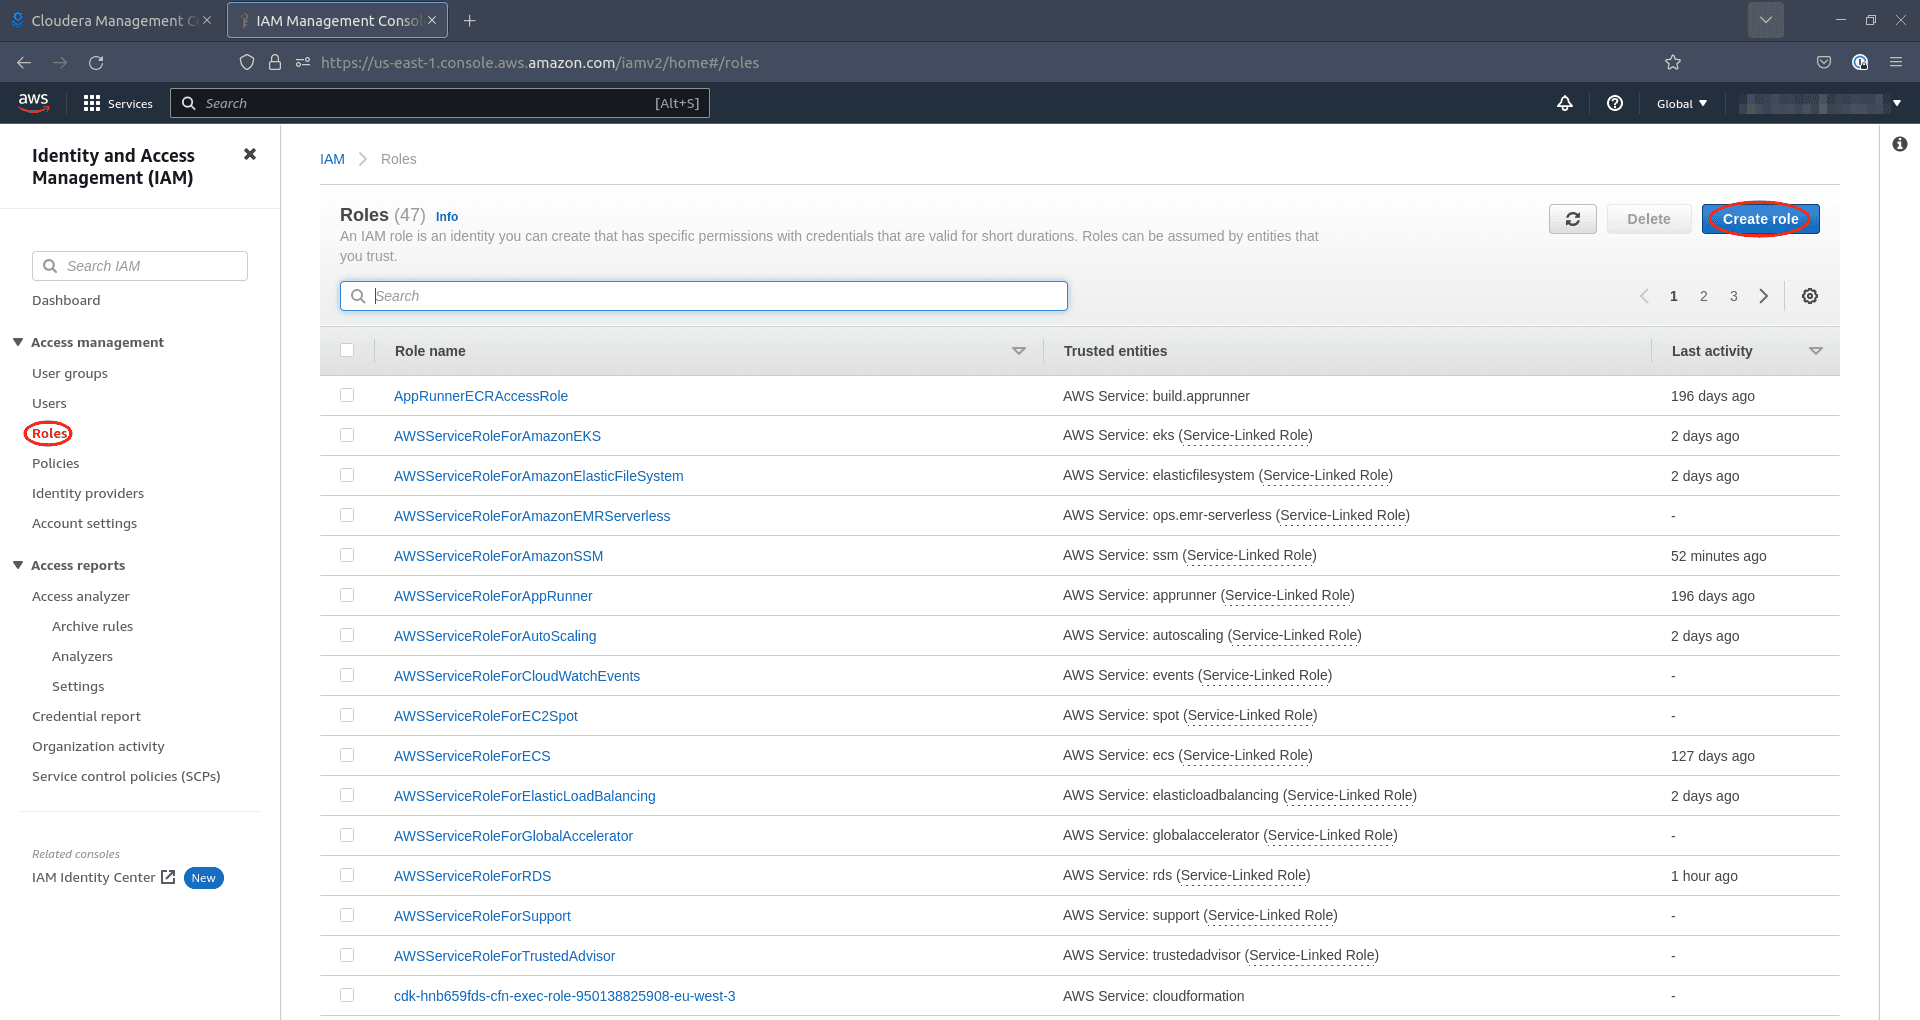
Stay in your AWS IAM console and navigate to Roles, then select Create role:
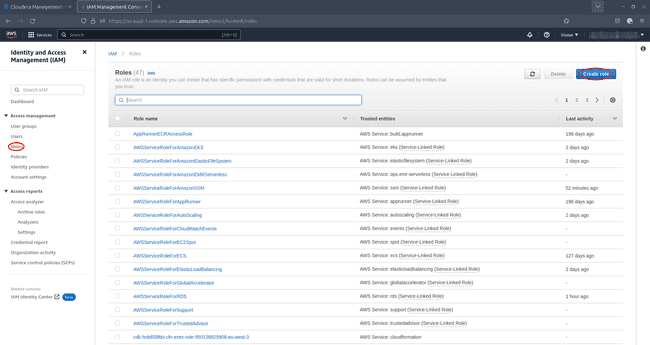
-
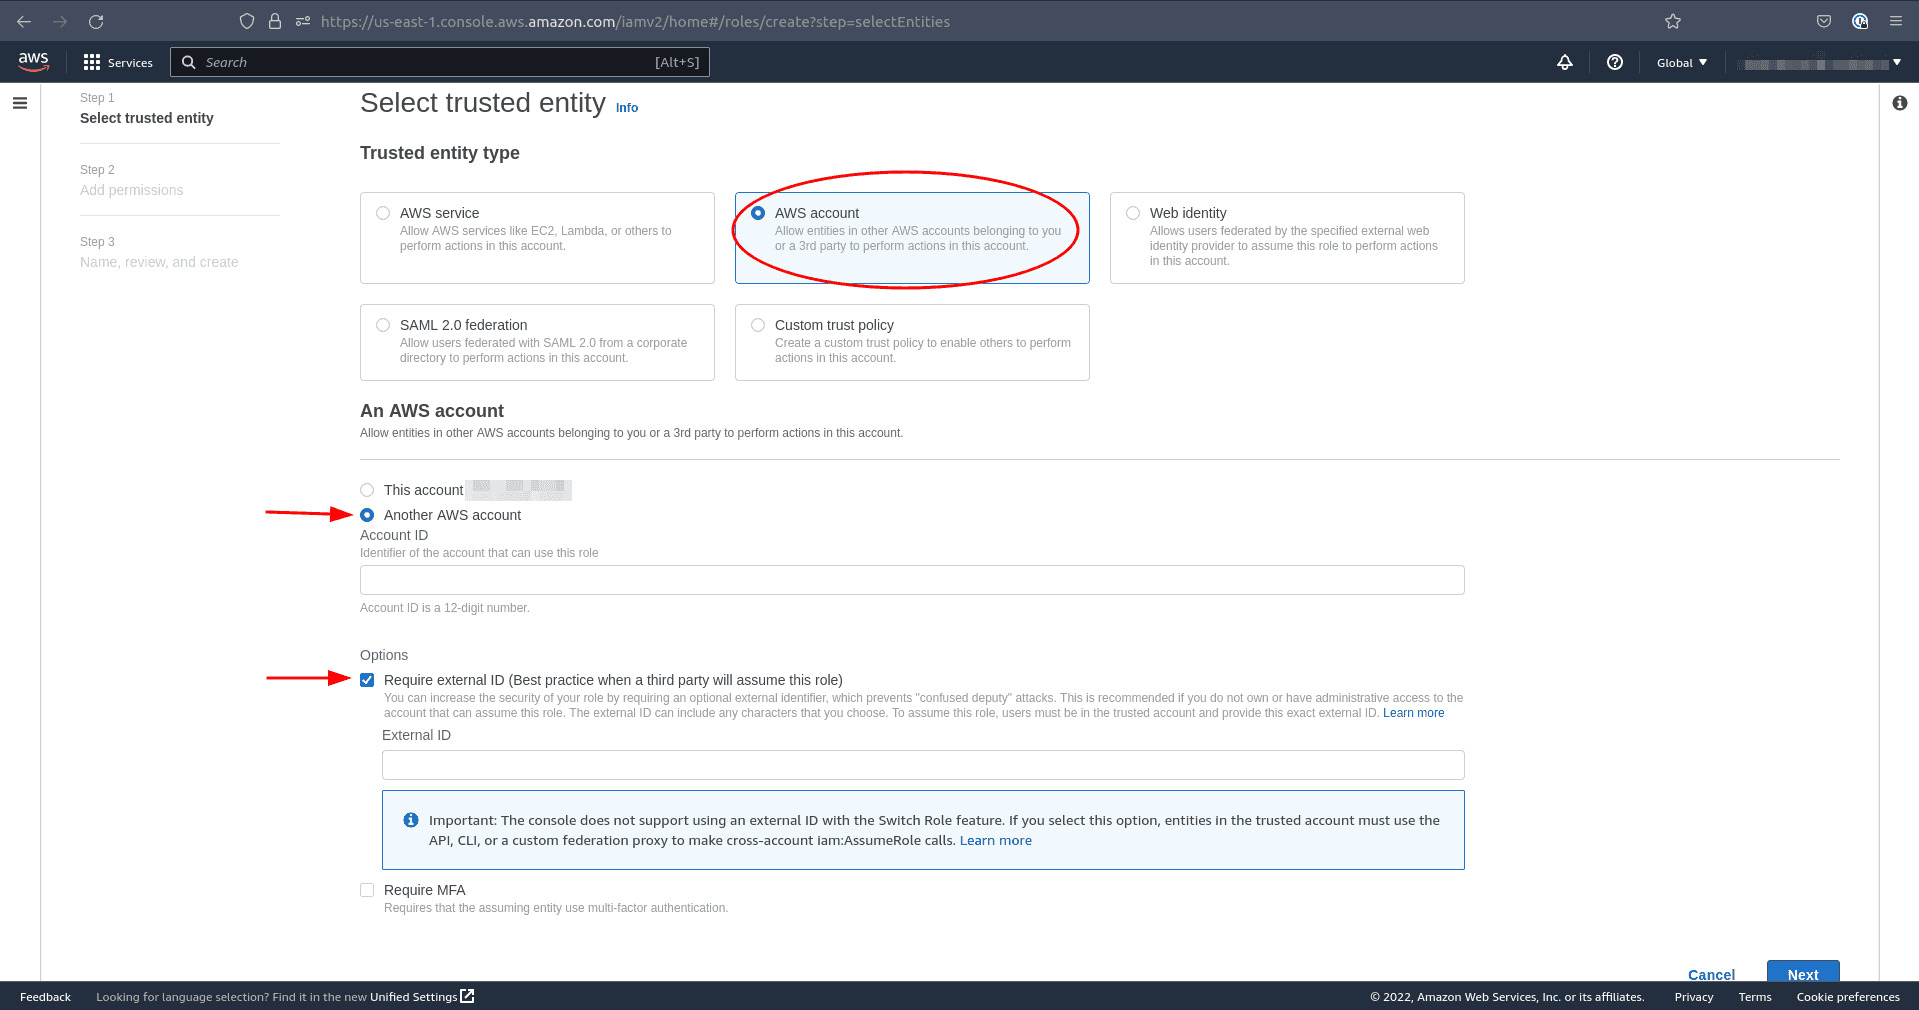
Under Trusted Entity Type select AWS Account. Select Another AWS account below and tick the option Require external ID:
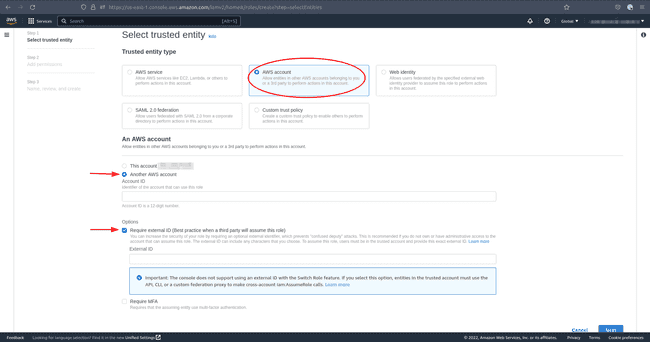
-
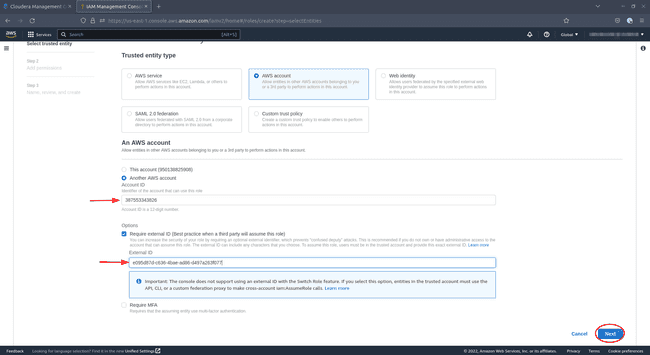
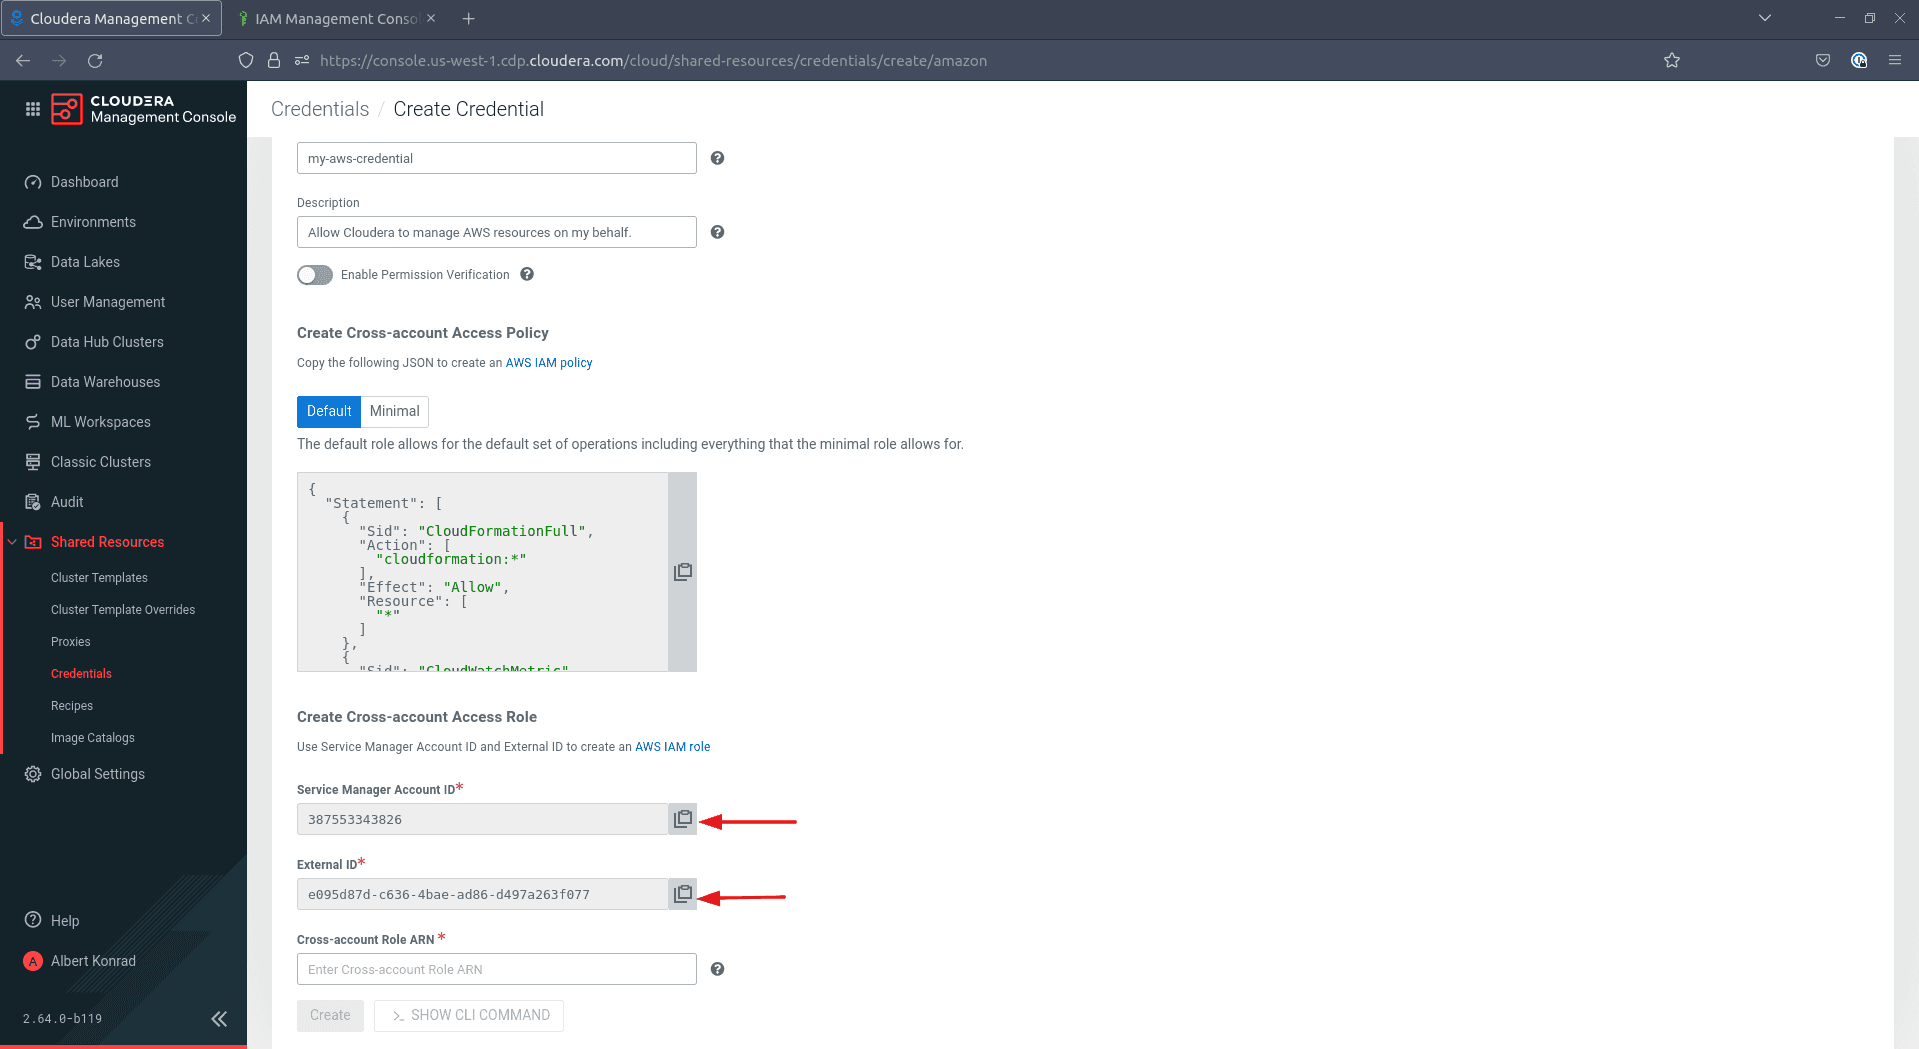
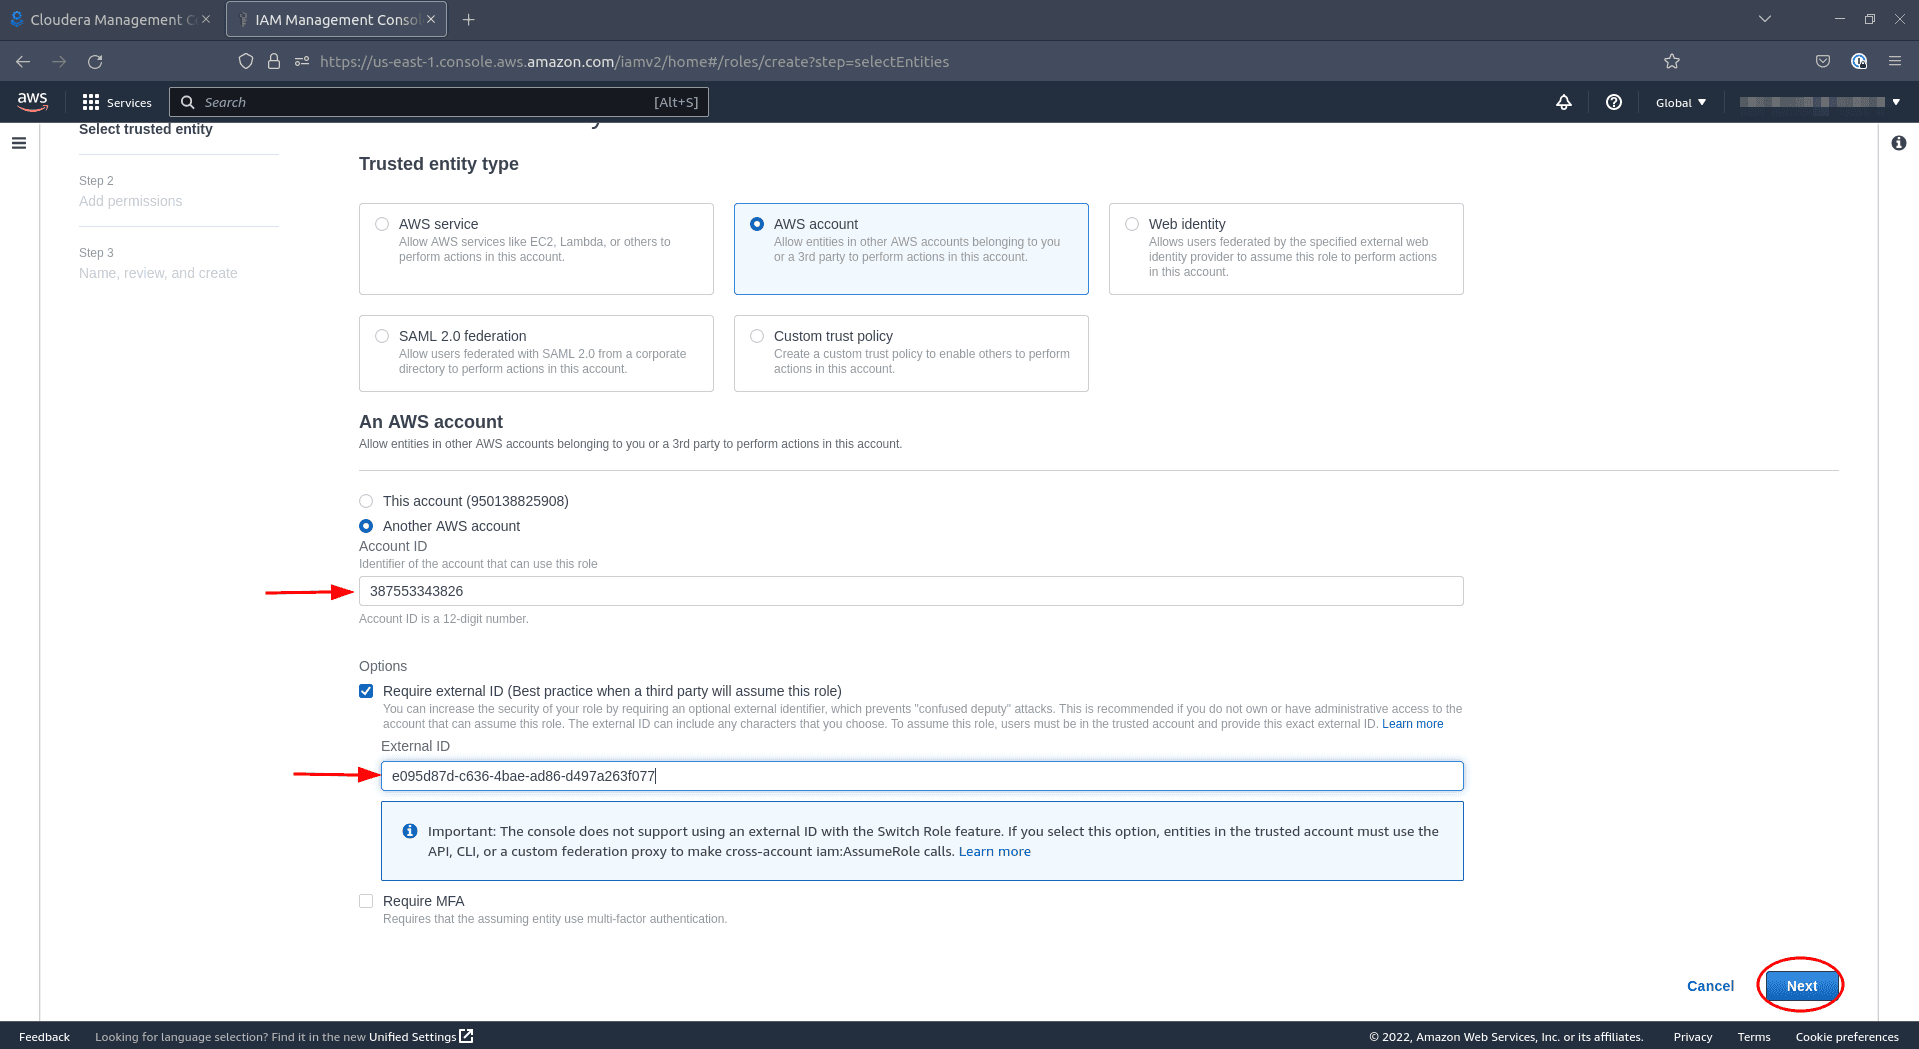
Return to your CDP console and copy the
Service Manager Account IDand theExternal IDinto the corresponding fields on AWS.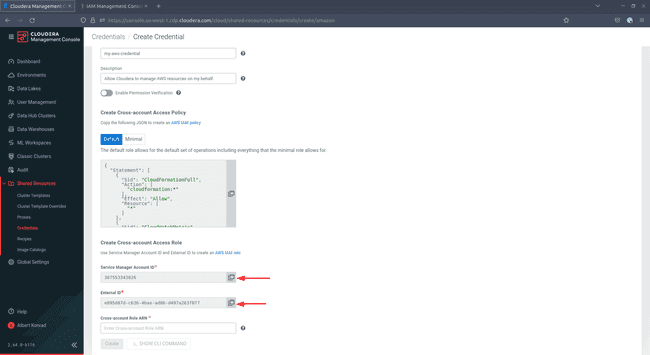
-
In the AWS IAM console, click Next after you pasted the two ids:
-
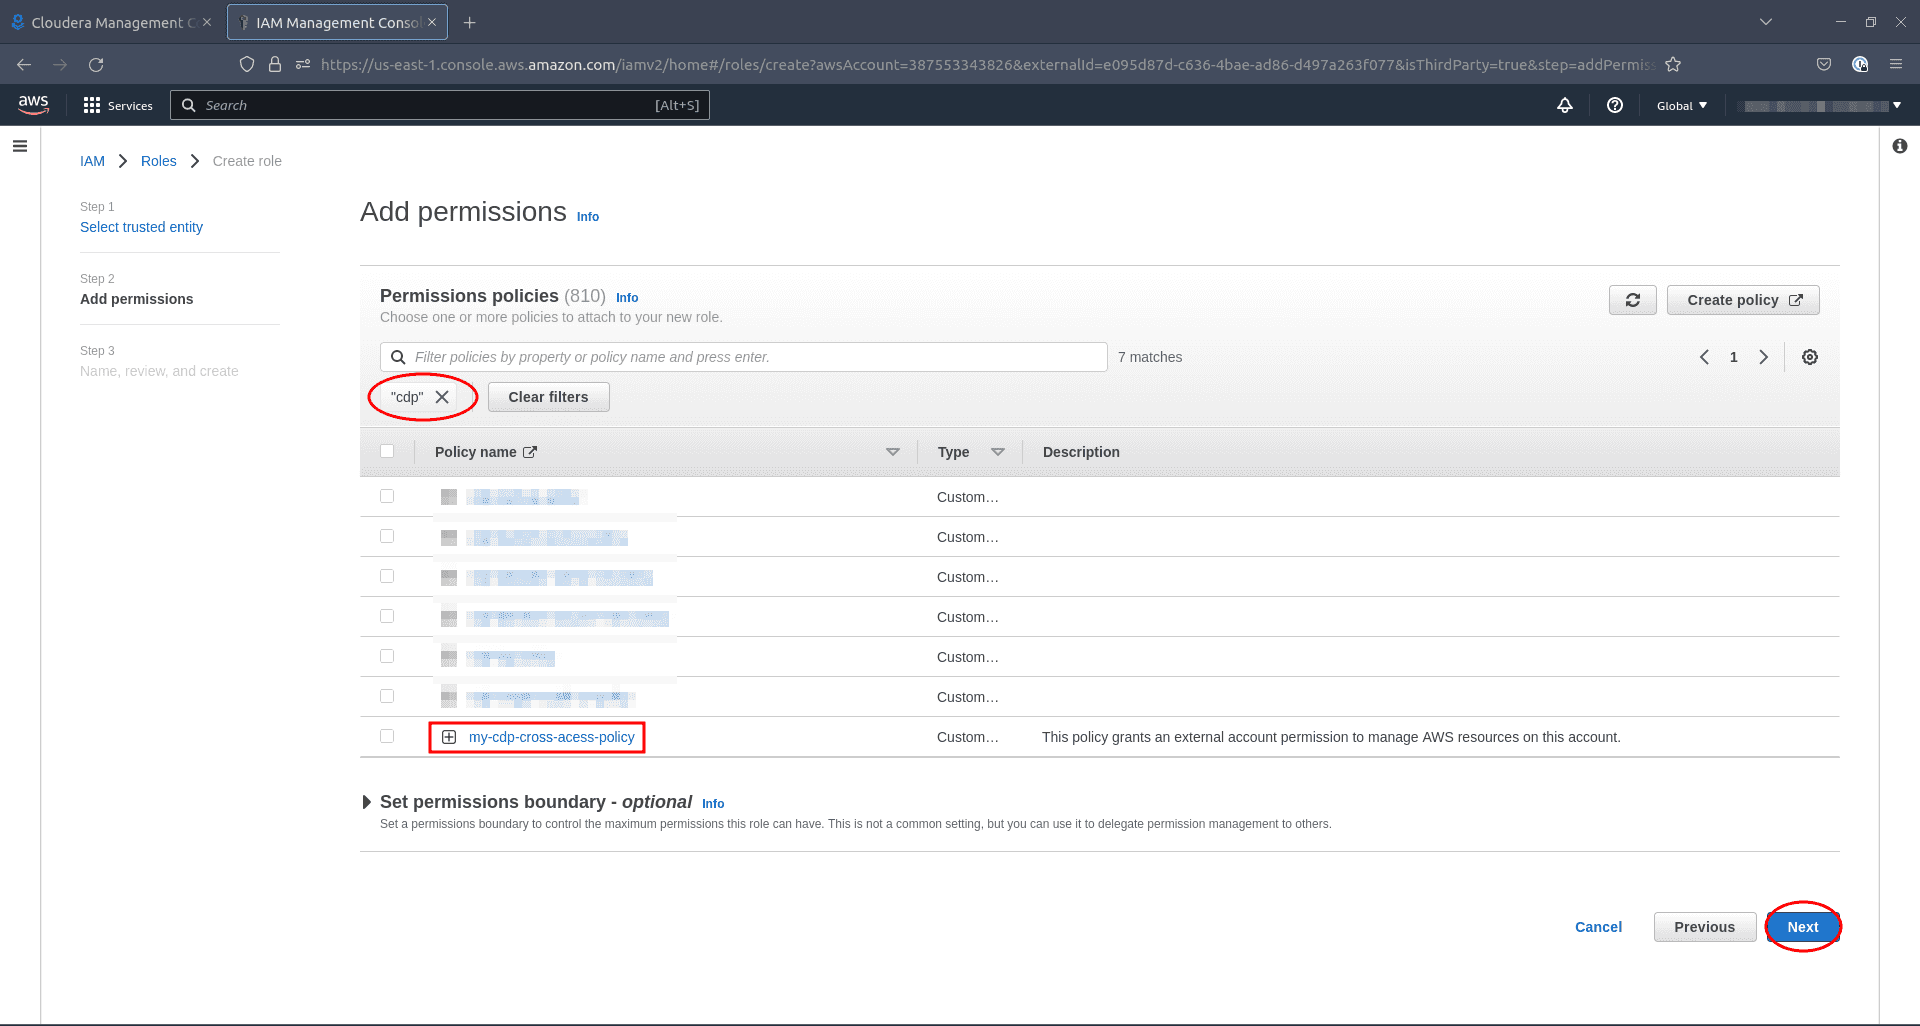
Under Permissions policies, find the policy you created earlier and tick the checkbox on the left, then click Next:
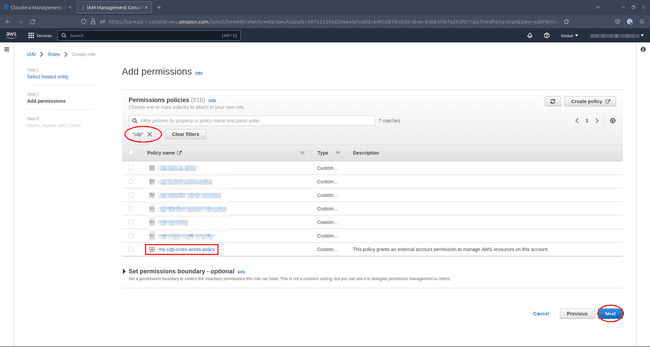
-
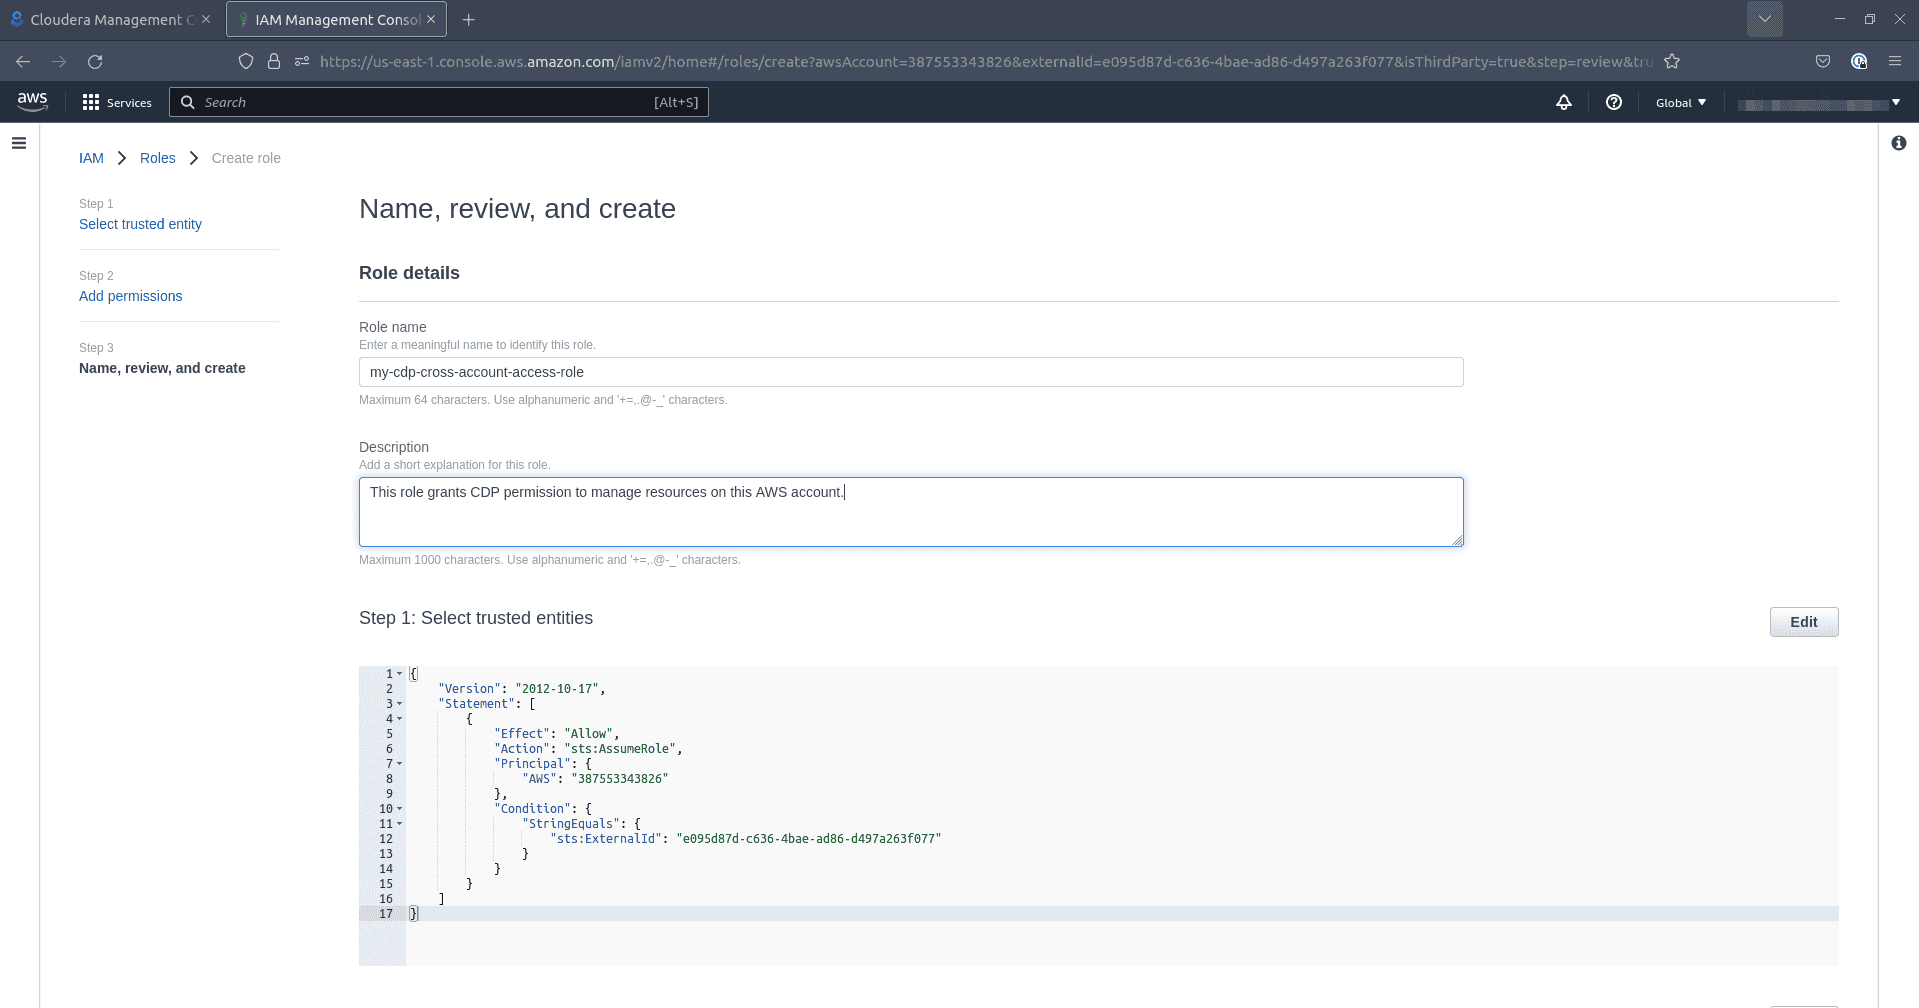
Under Name, review, and create, enter a name and optionally a description for your role. Scroll down, optionally add tags and then click Create:
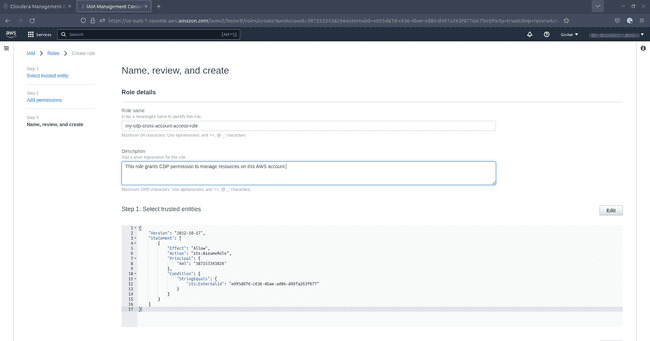
-
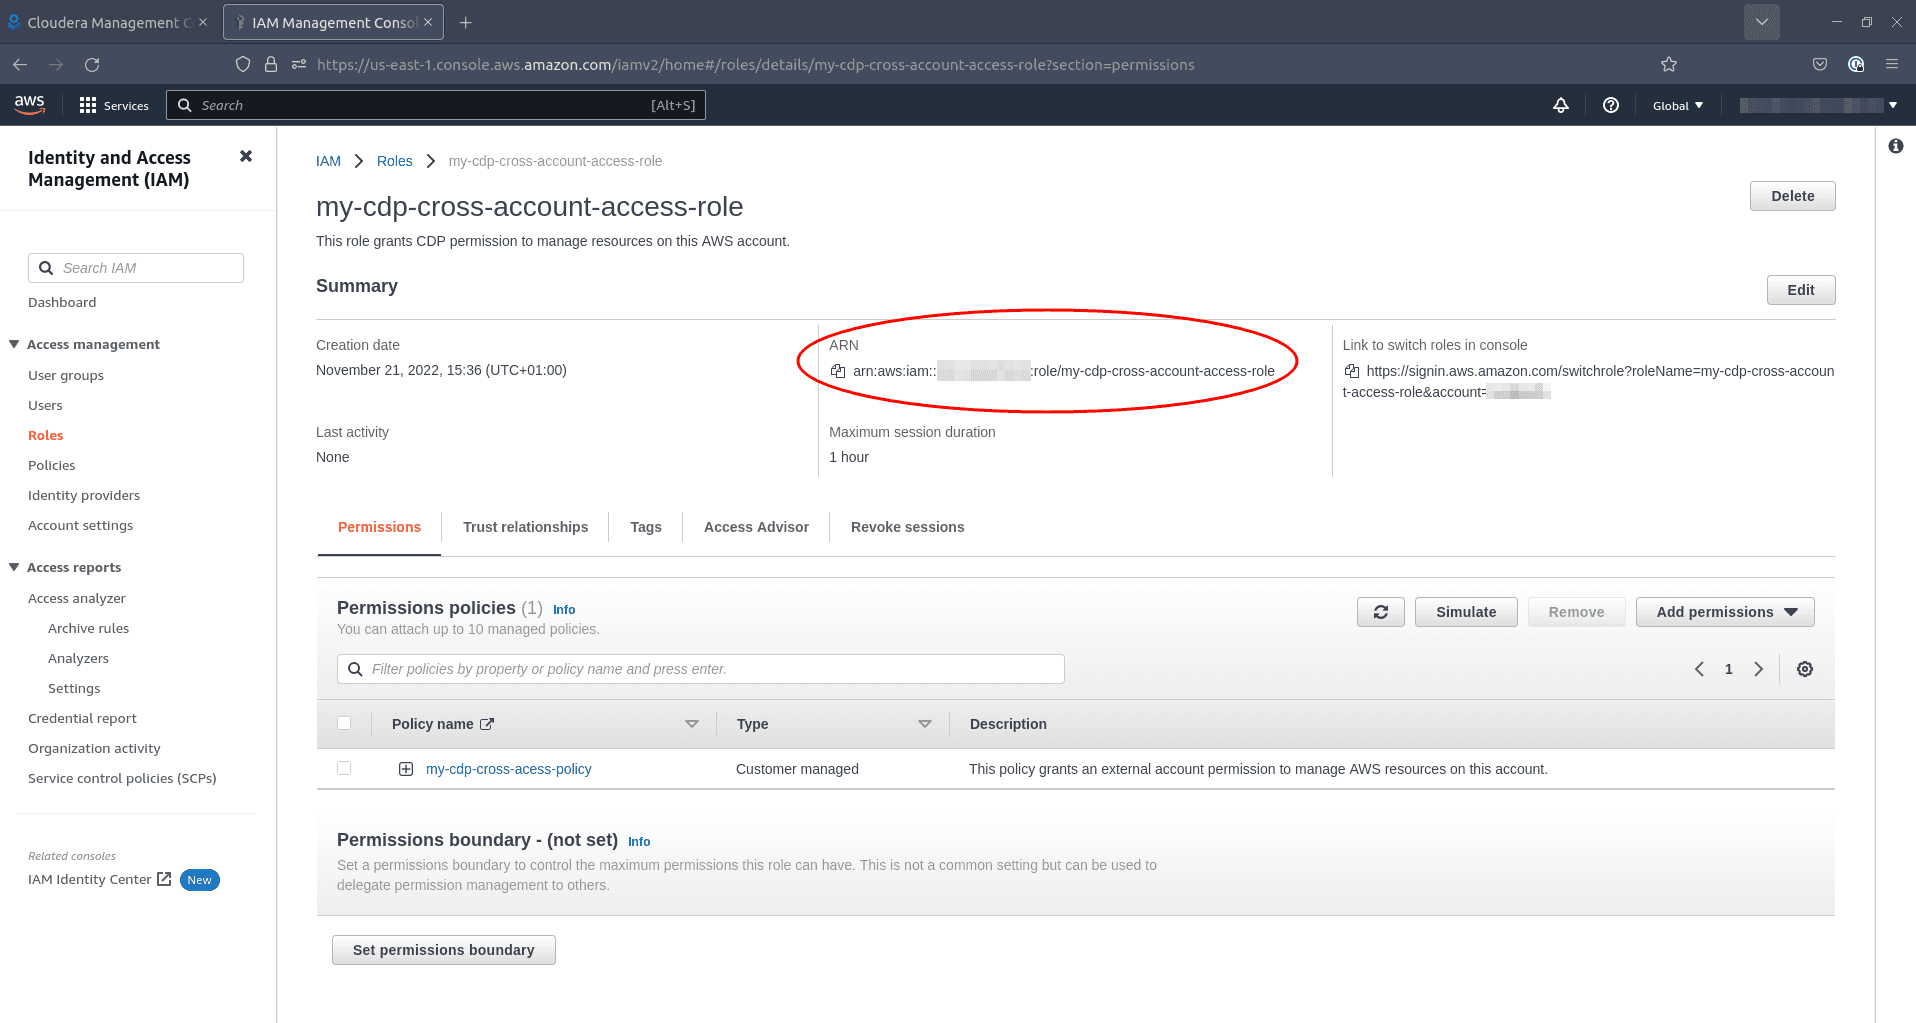
Find your newly created role in the AWS IAM console:
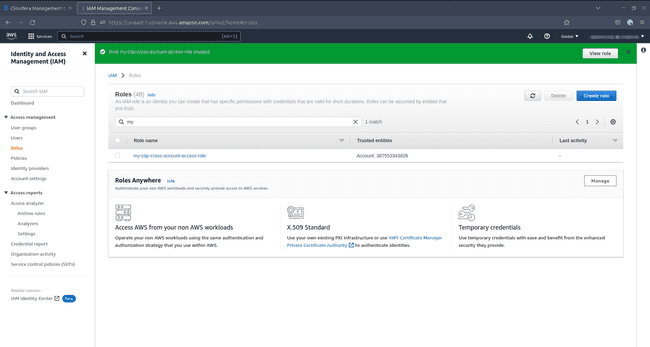
-
Copy the ARN of your newly created role:
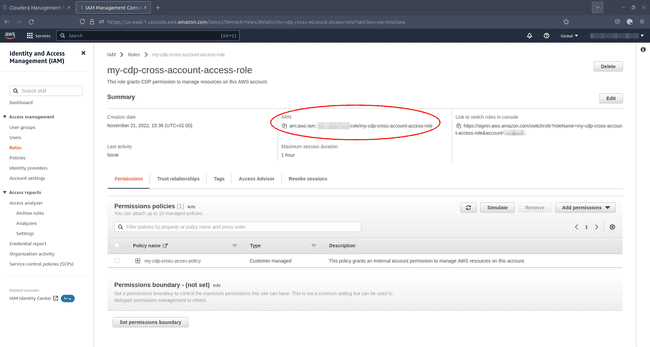
-
Go back to your CDP console and paste the ARN of your cross-account access role into the corresponding field, then click Create:
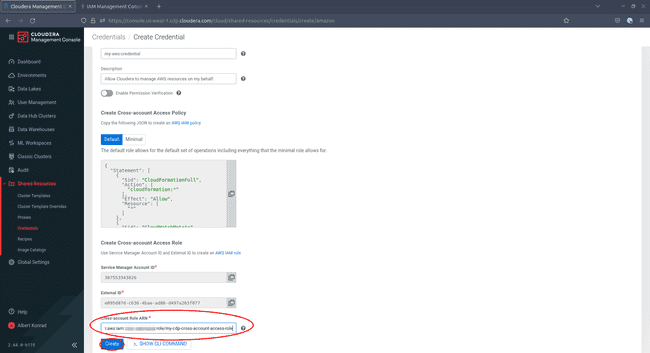


Congratulations, you have set up your credential to manage AWS resources via CDP.
Configure an AWS CloudFormation Stack
Next, we create a CloudFormation stack. This stack is going to contain the basic IAM policies, roles and instance profiles that are used by our CDP resources as well as the basic configuration of our data lake.
-
To start, download the CloudFormation stack template provided by Cloudera
-
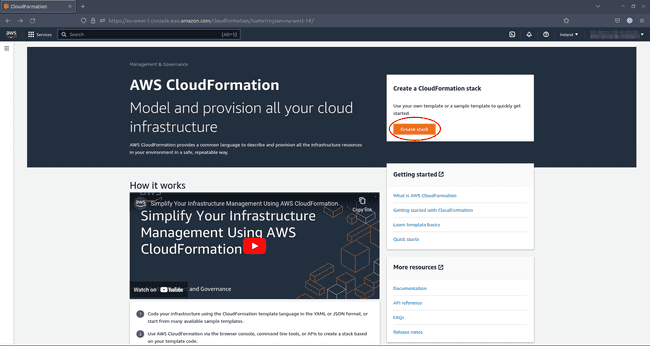
Next, access your AWS console and navigate to the CloudFormation service.
-
Important: Make sure you are connected to the AWS region you want to create your stack in. For the purpose of this tutorial, we stay in the EU Ireland (
eu-west-1) region. -
Click on Create stack.
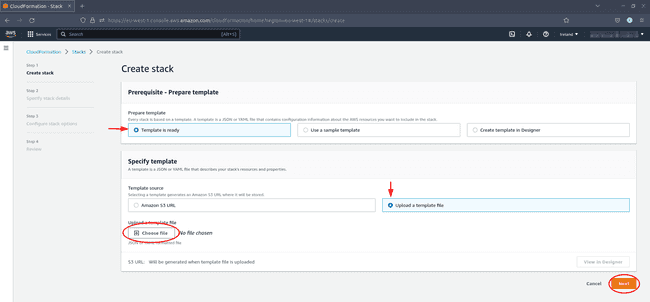
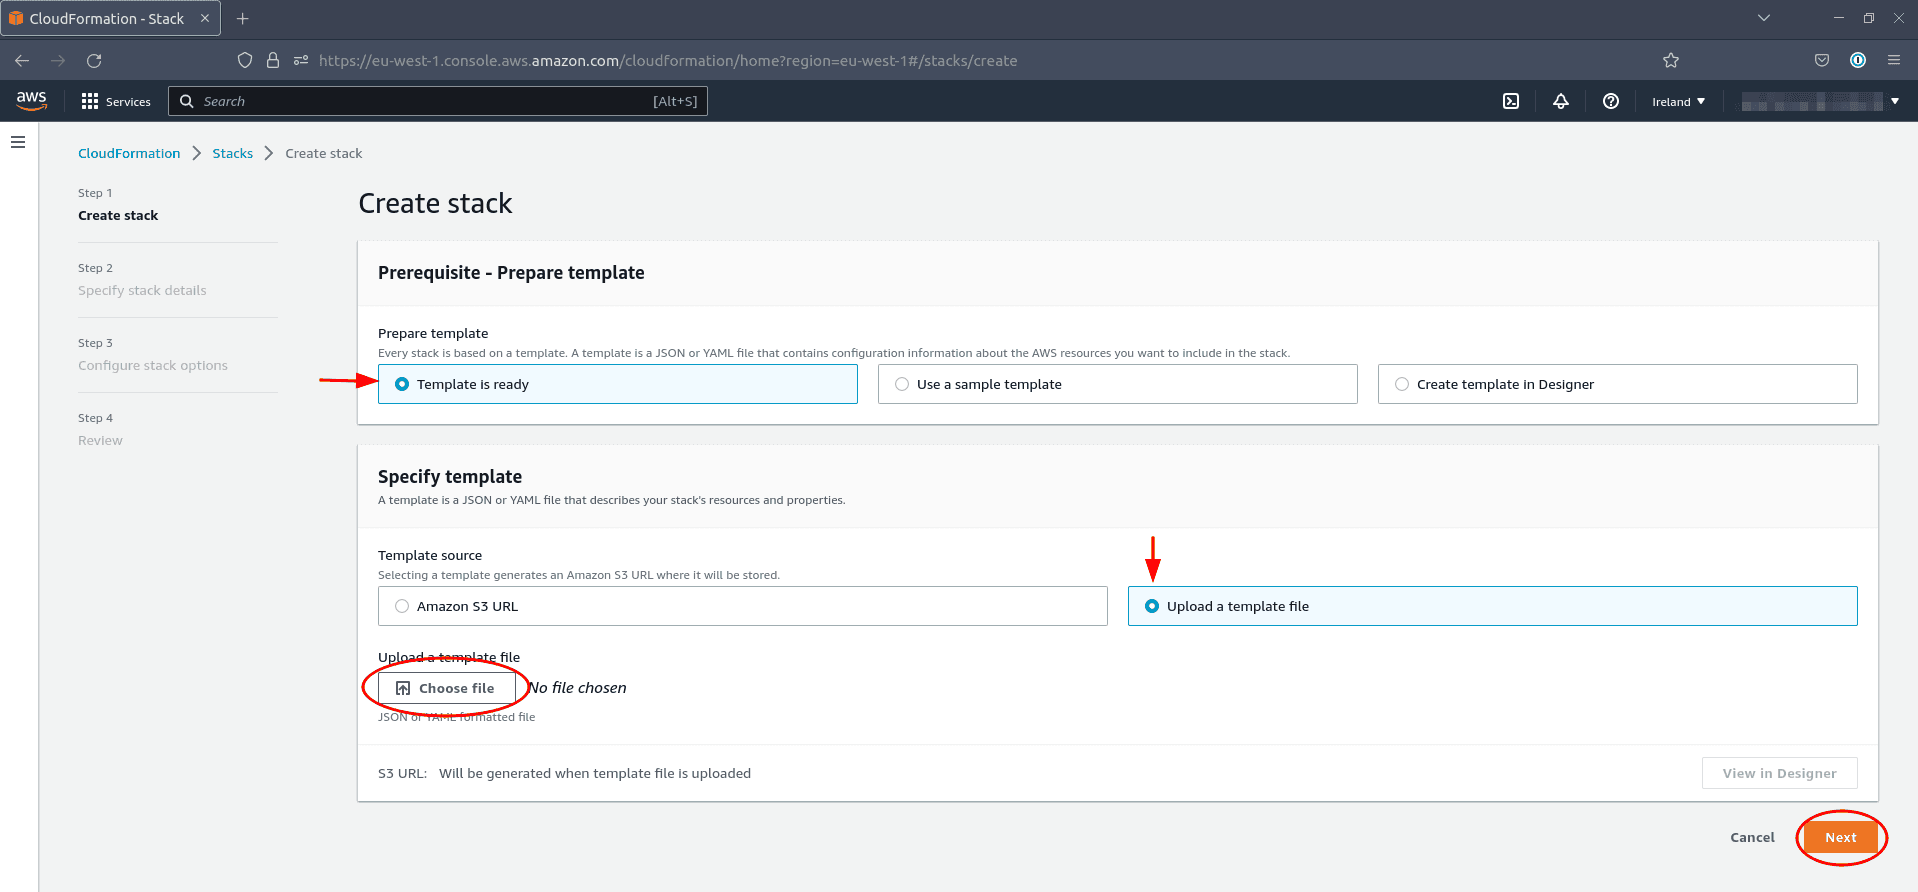
-
Select Template is ready and Upload template file, then use the file upload dialog to upload the stack template you downloaded earlier. When done, click Next.
-
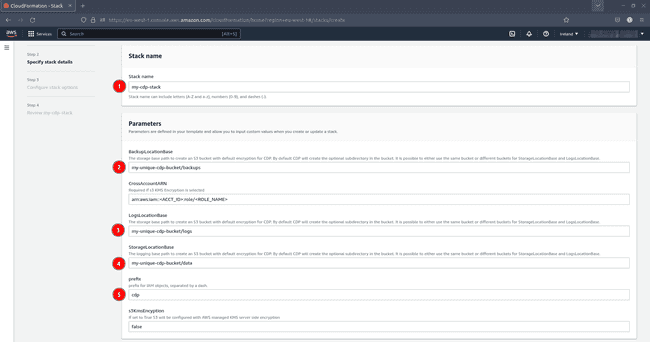
Configure your stack as follows:
- Choose a stack name, for example
my-cdp-stack - Choose a S3 bucket and directory to store backups, for example
my-unique-cdp-bucket/backups - Choose a S3 bucket and directory to store logs, for example
my-unique-cdp-bucket/logs - Choose a S3 bucket and directory to store data, for example
my-unique-cdp-bucket/data - Decide a prefix to use for all IAM resources generated by this stack, for example
cdp
- Choose a stack name, for example

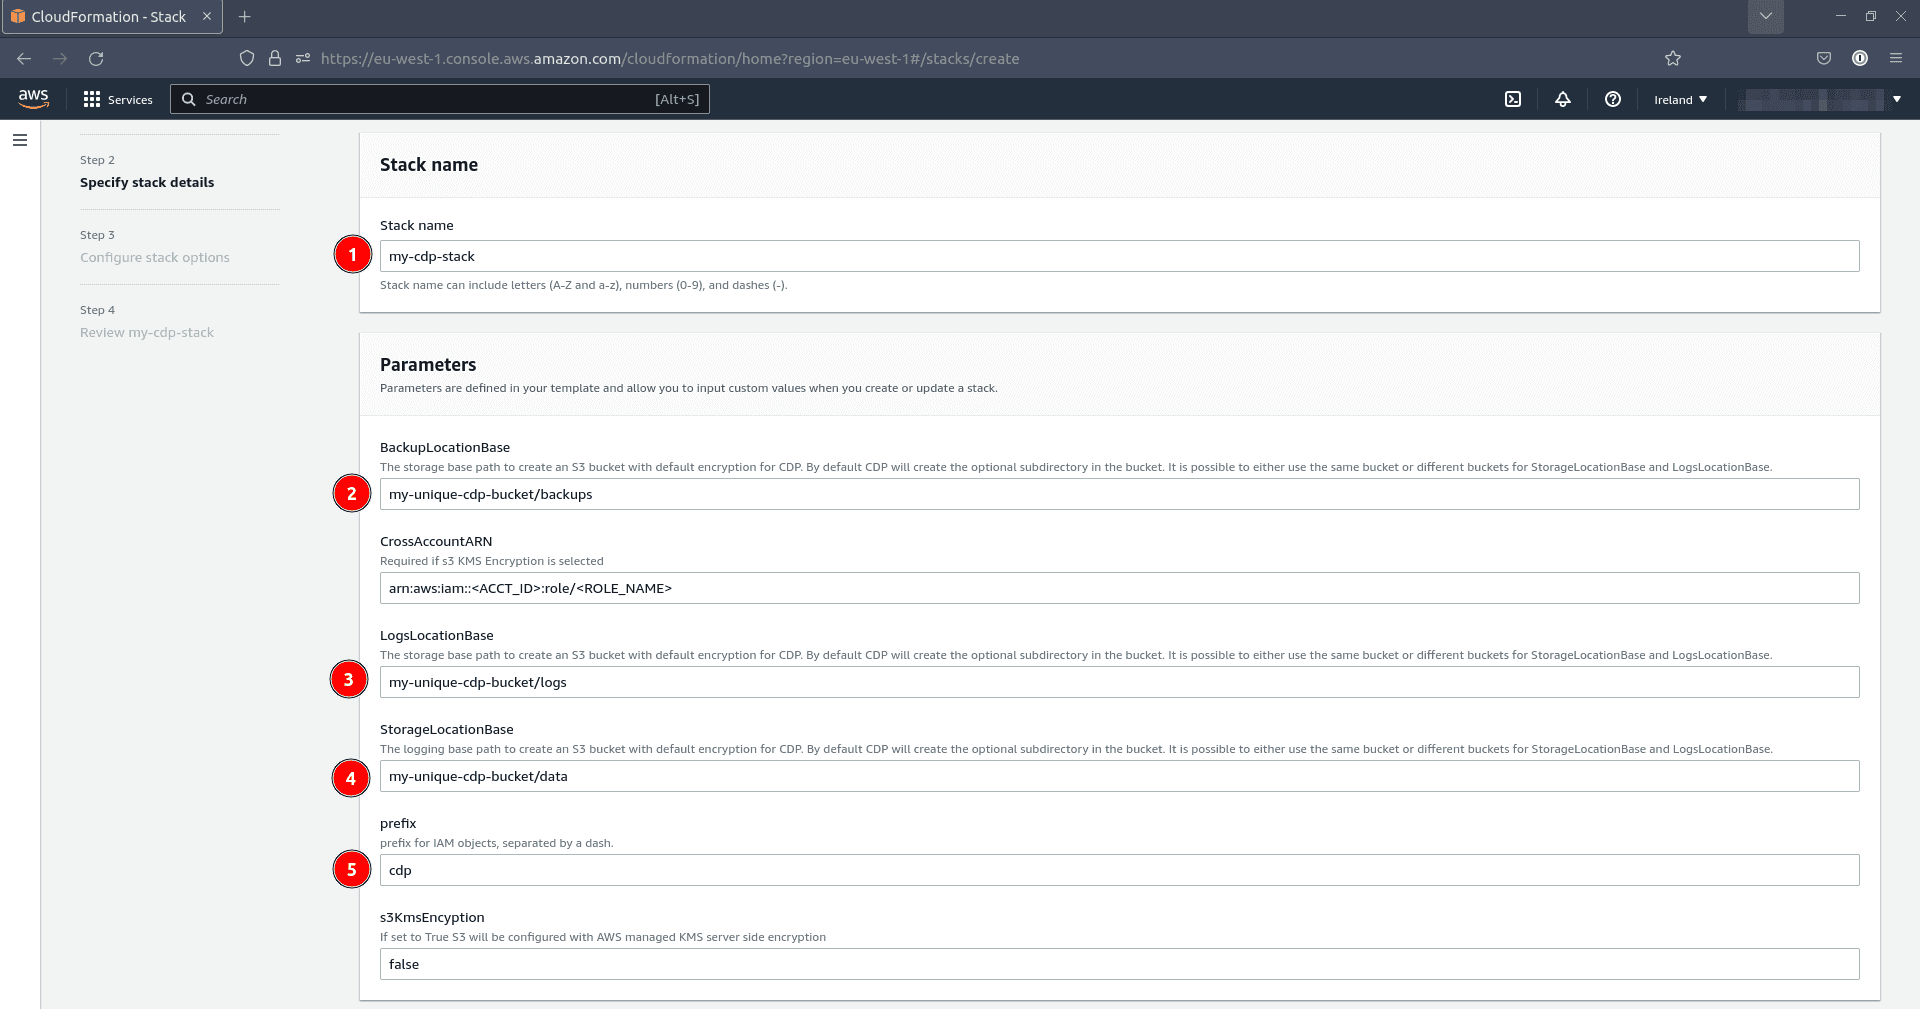
Remember that your S3 bucket name must be globally unique. Be sure to use the same bucket for all three storage locations (
/backups,/logs, and/data).
-
Click Next, optionally add tags for your stack but change nothing else and click Next again.
-
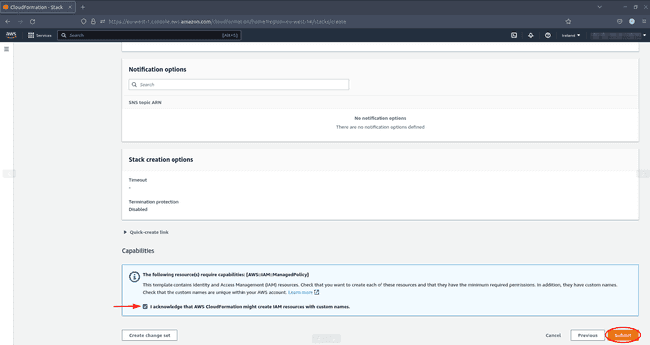
Under Review stack, scroll all the way to the bottom and confirm you acknowledge that AWS CloudFormation might create IAM resources with custom names. Click Submit to create your stack.
-
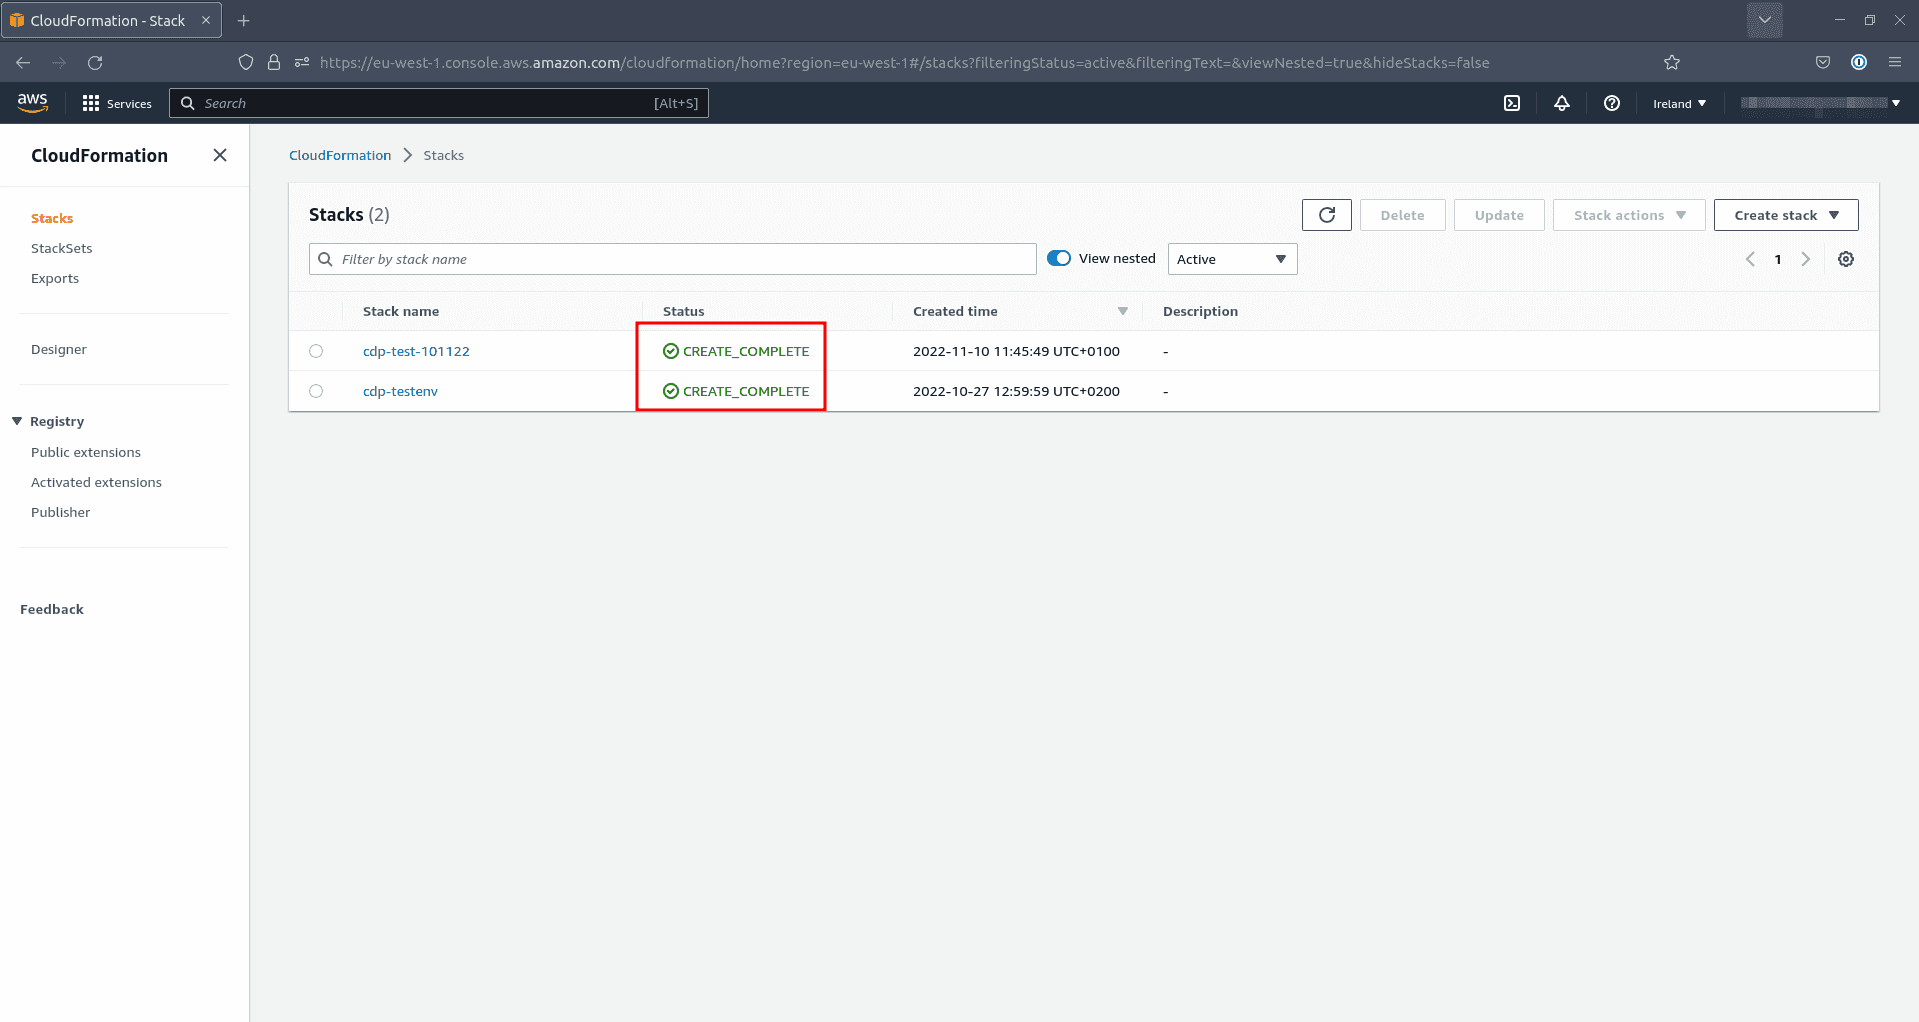
Wait for your stack to create. You see a green
CREATE COMPLETEmessage in CloudFormation once the process has completed successfully.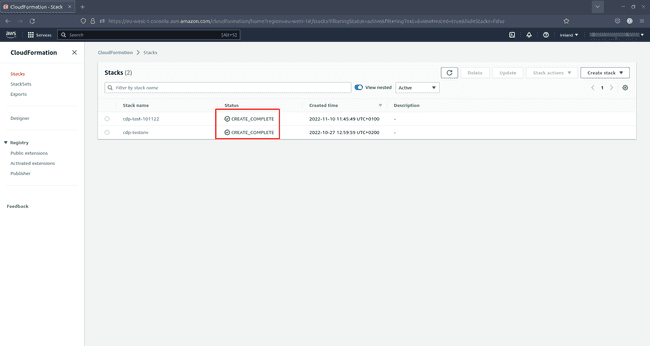

And that’s it! You now have a stack on which you may deploy a CDP Public Cloud Environment in AWS.
Create an SSH Key Pair
When you create your CDP environment you are required to provide an SSH Key pair. While you have the option to create a new key pair as you register the environment, it is preferable to create it in advance.
-
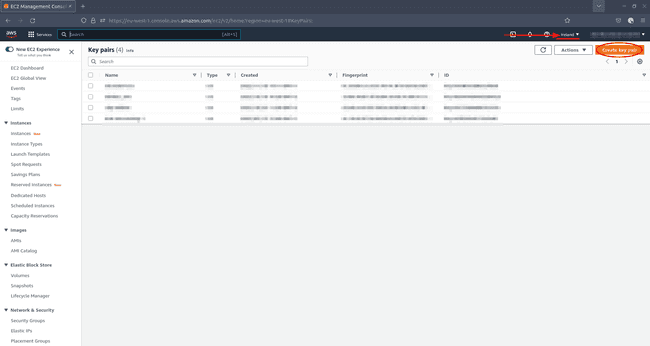
To create a new SSH key pair, access your AWS console and navigate to EC2 > Network & Security > Key Pairs. Make sure you are in the region you want to create your environment in and click Create key pair:
-
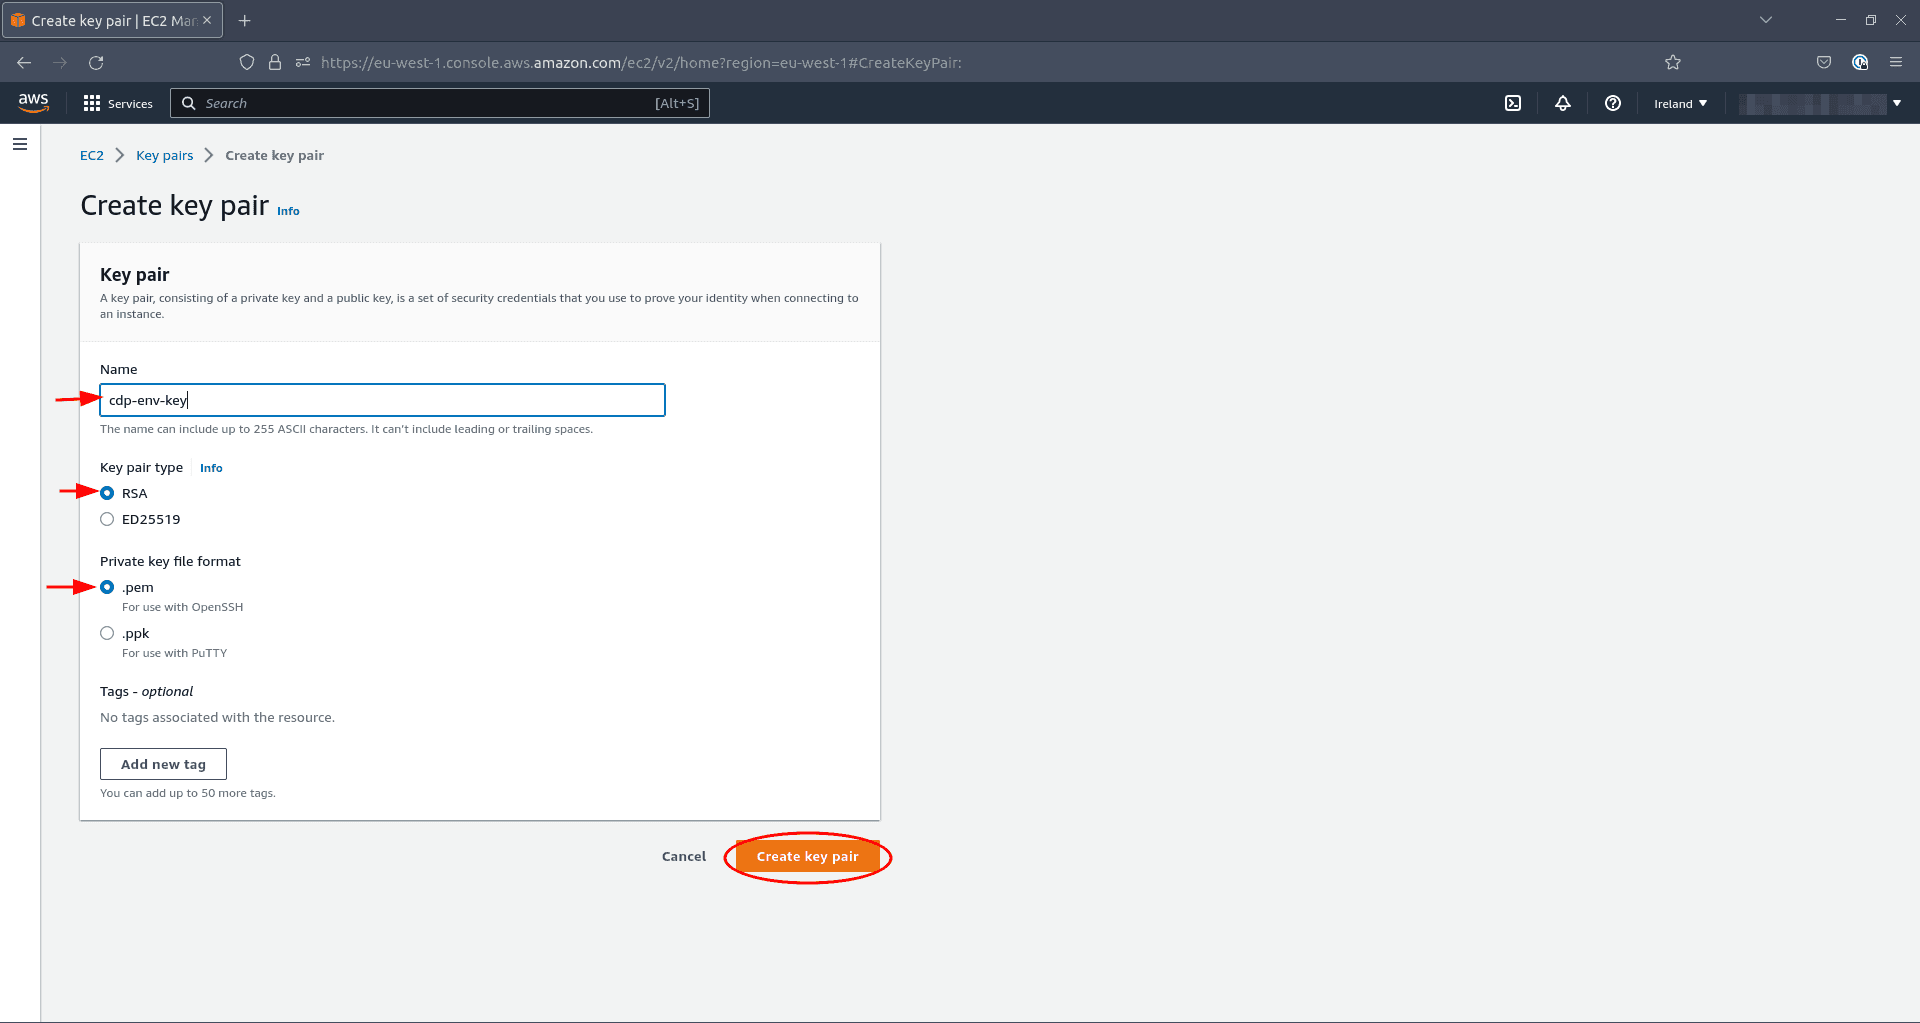
Under Create key pair, provide a name for your key pair. You are going to need this name later when you create your environment. Choose
RSAas Key pair type and.pemas Private key file format. Optionally add some tags and click Create key pair.

Register a CDP Environment in AWS
With all the setup complete, we are now finally ready to launch our CDP environment on AWS.
Before we proceed it is important to remind you that the resources launched by CDP are not free. If you decide to follow along, you will incur some cost on your AWS account. Whenever you practice with any cloud service, be sure to remove resources when done.
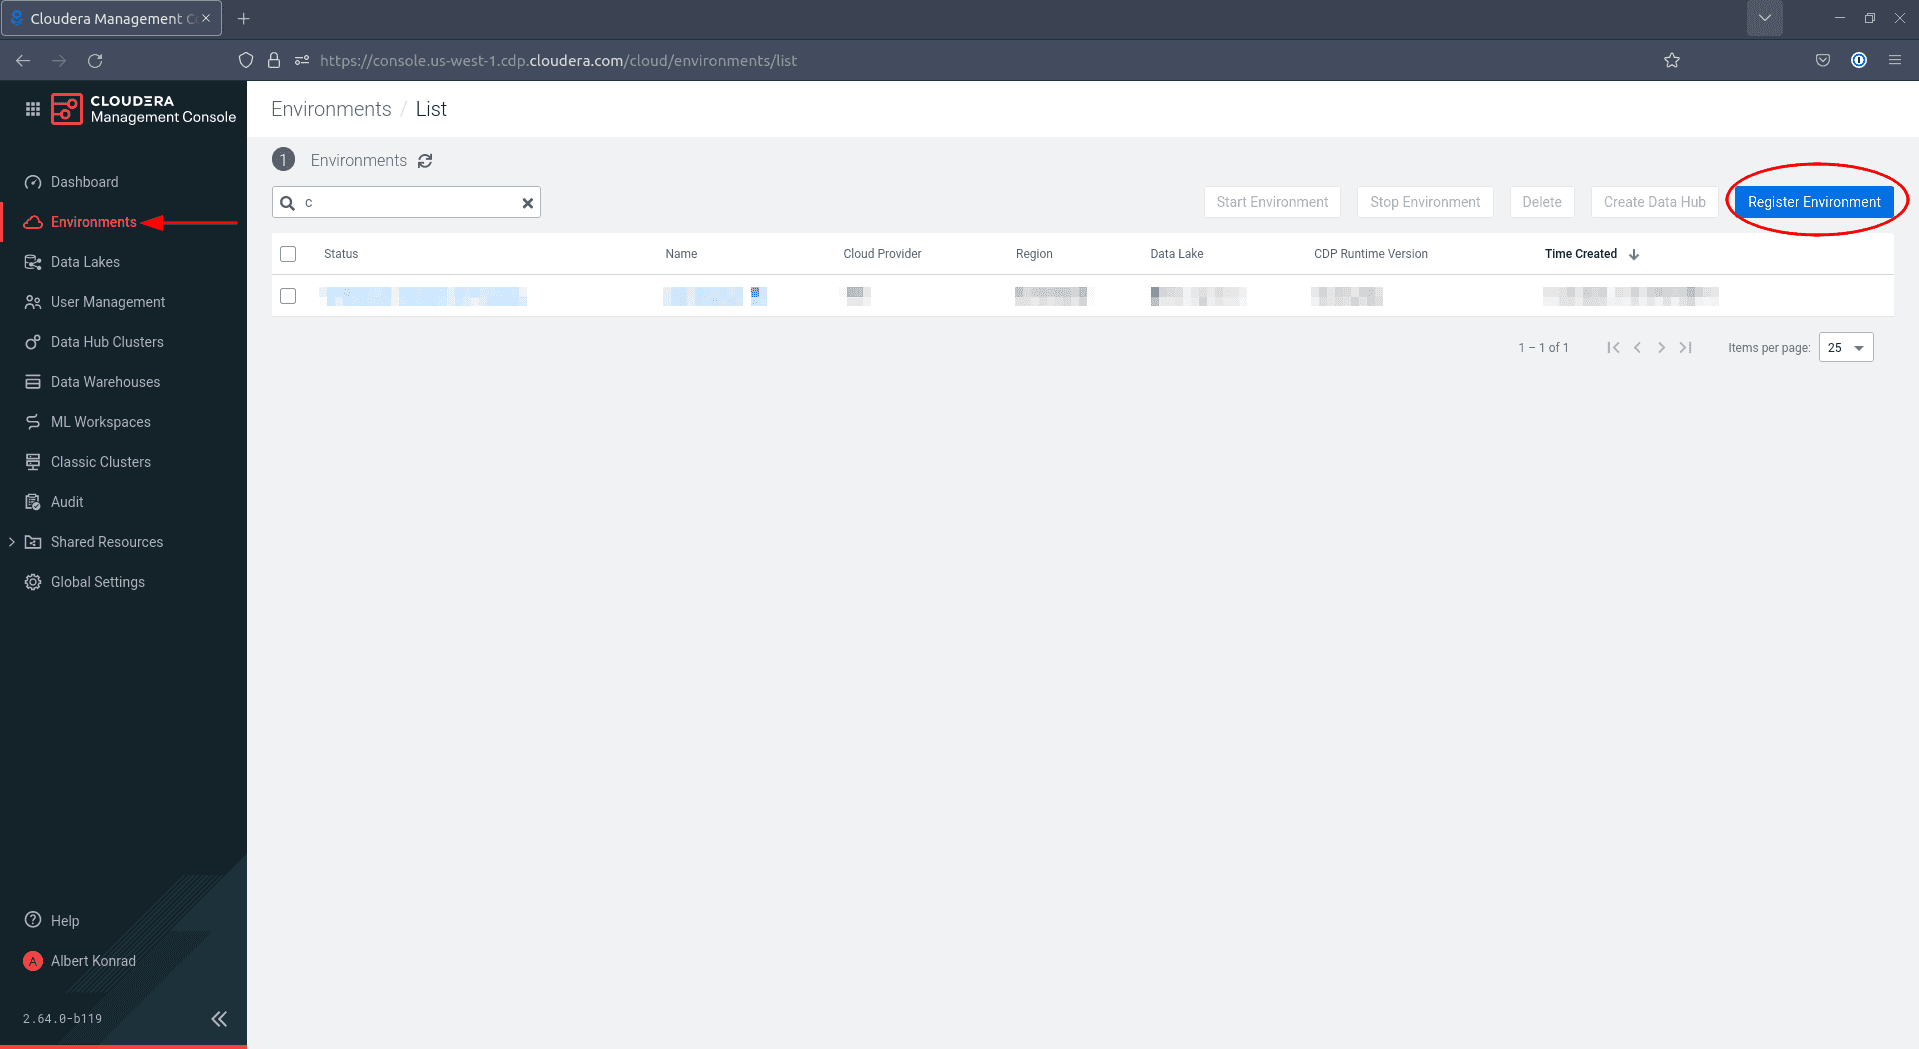
-
To begin deploying an environment via the CDP console, navigate to Management Console > Environments and click Register Environment:

-
In the Register Environment dialog, provide a name and optionally a description for your environment. Select
AWSas Cloud Provider and pick the credential you created earlier, then click Next:
-
Provide a name and select a runtime version for your data lake. Always select the latest available runtime version unless you have a specific requirement for an earlier version.
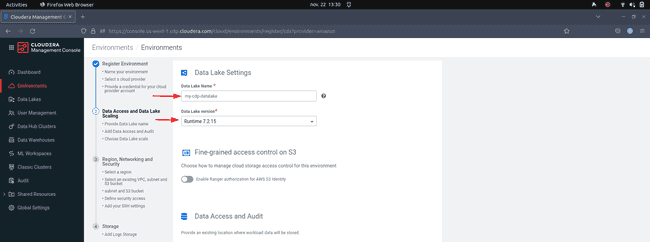
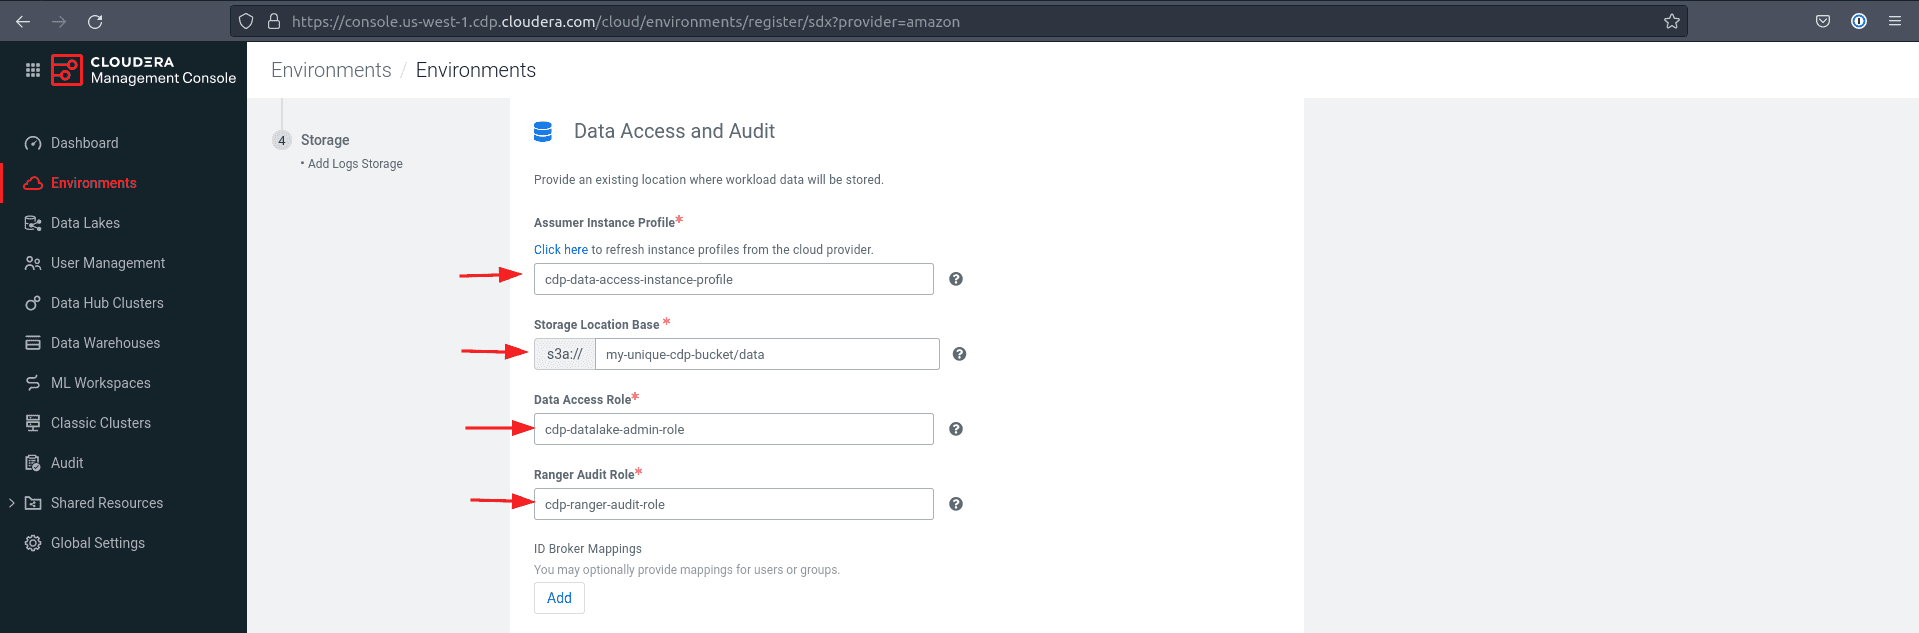
-
Under Data Access and Audit select the roles, instance profiles and storage locations you created when you registered your stack.

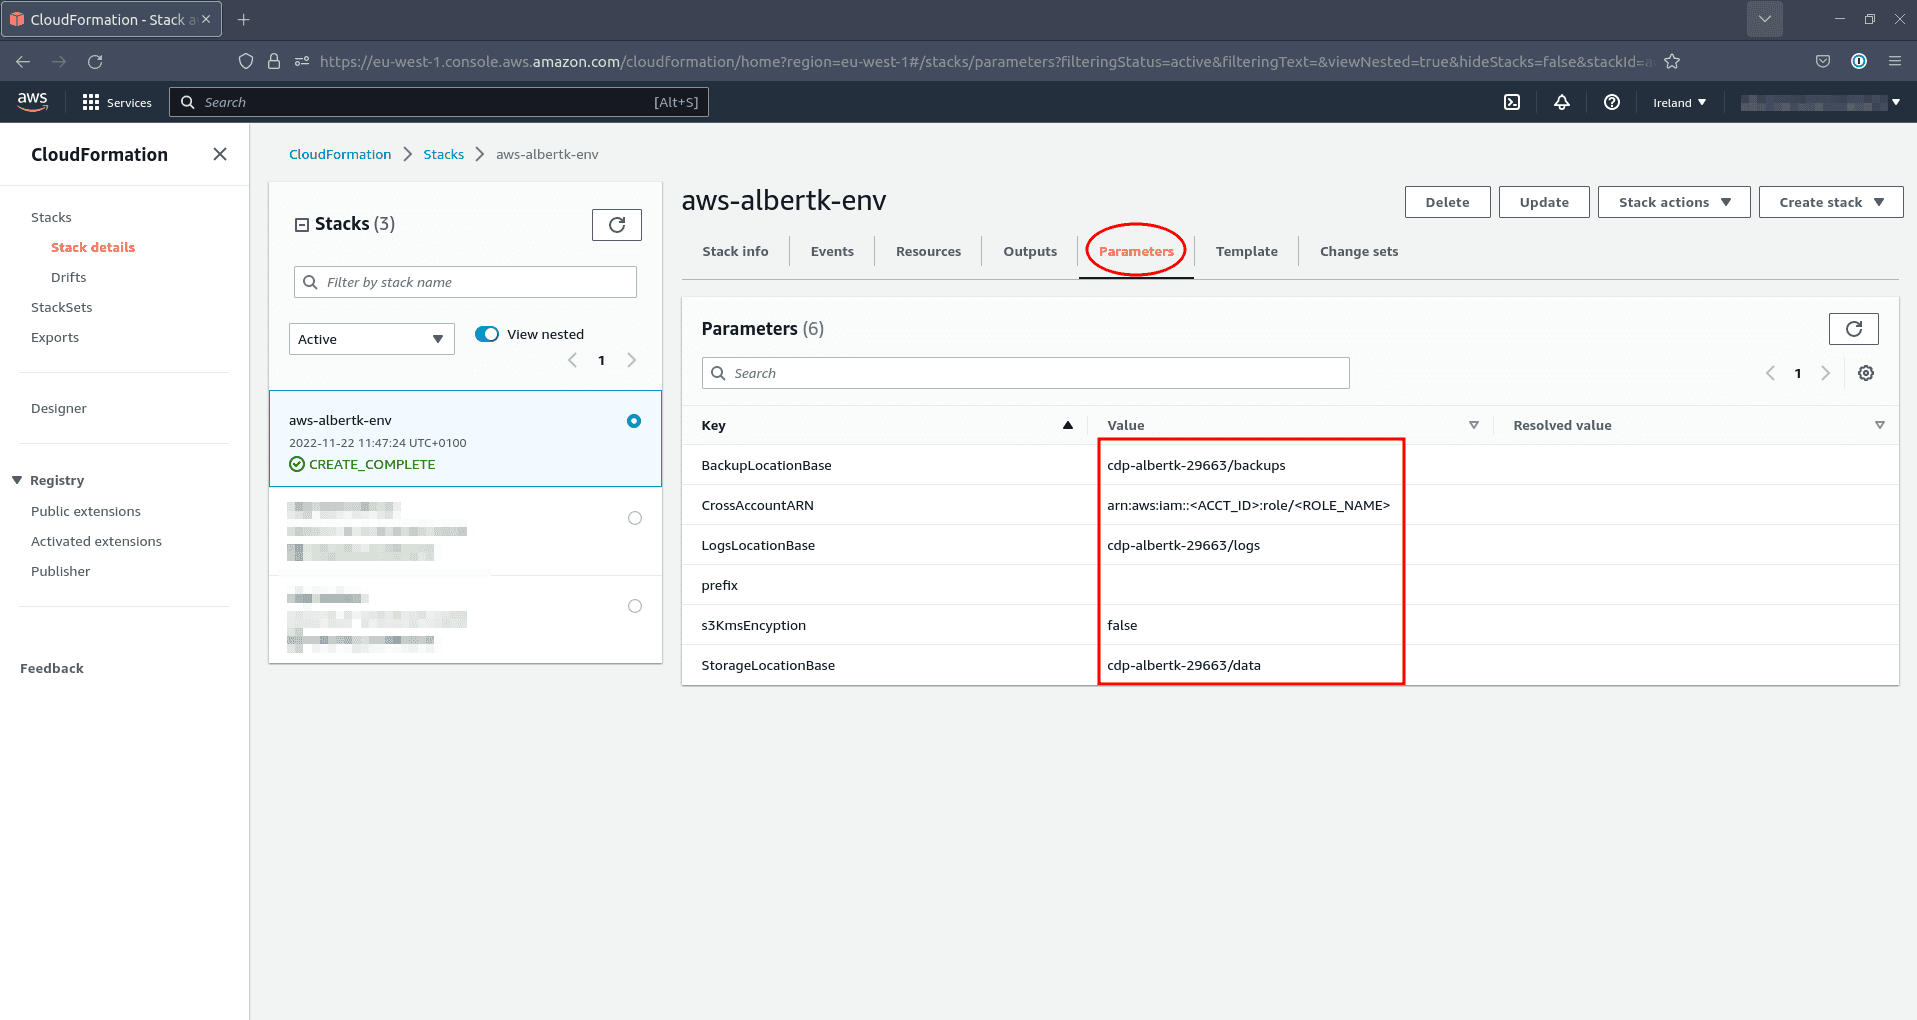
-
If you don’t remember the details, look them up in AWS CloudFormation. Simply click on your stack and select the Parameters tab:
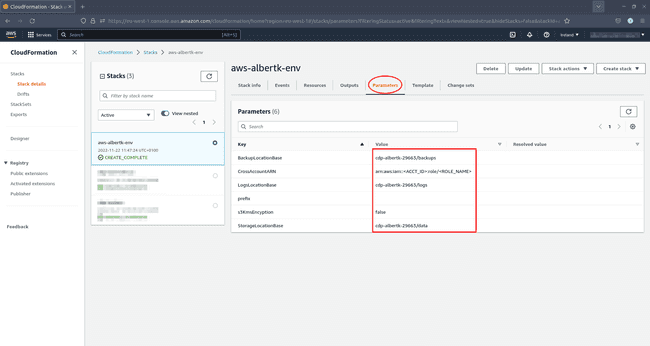
-
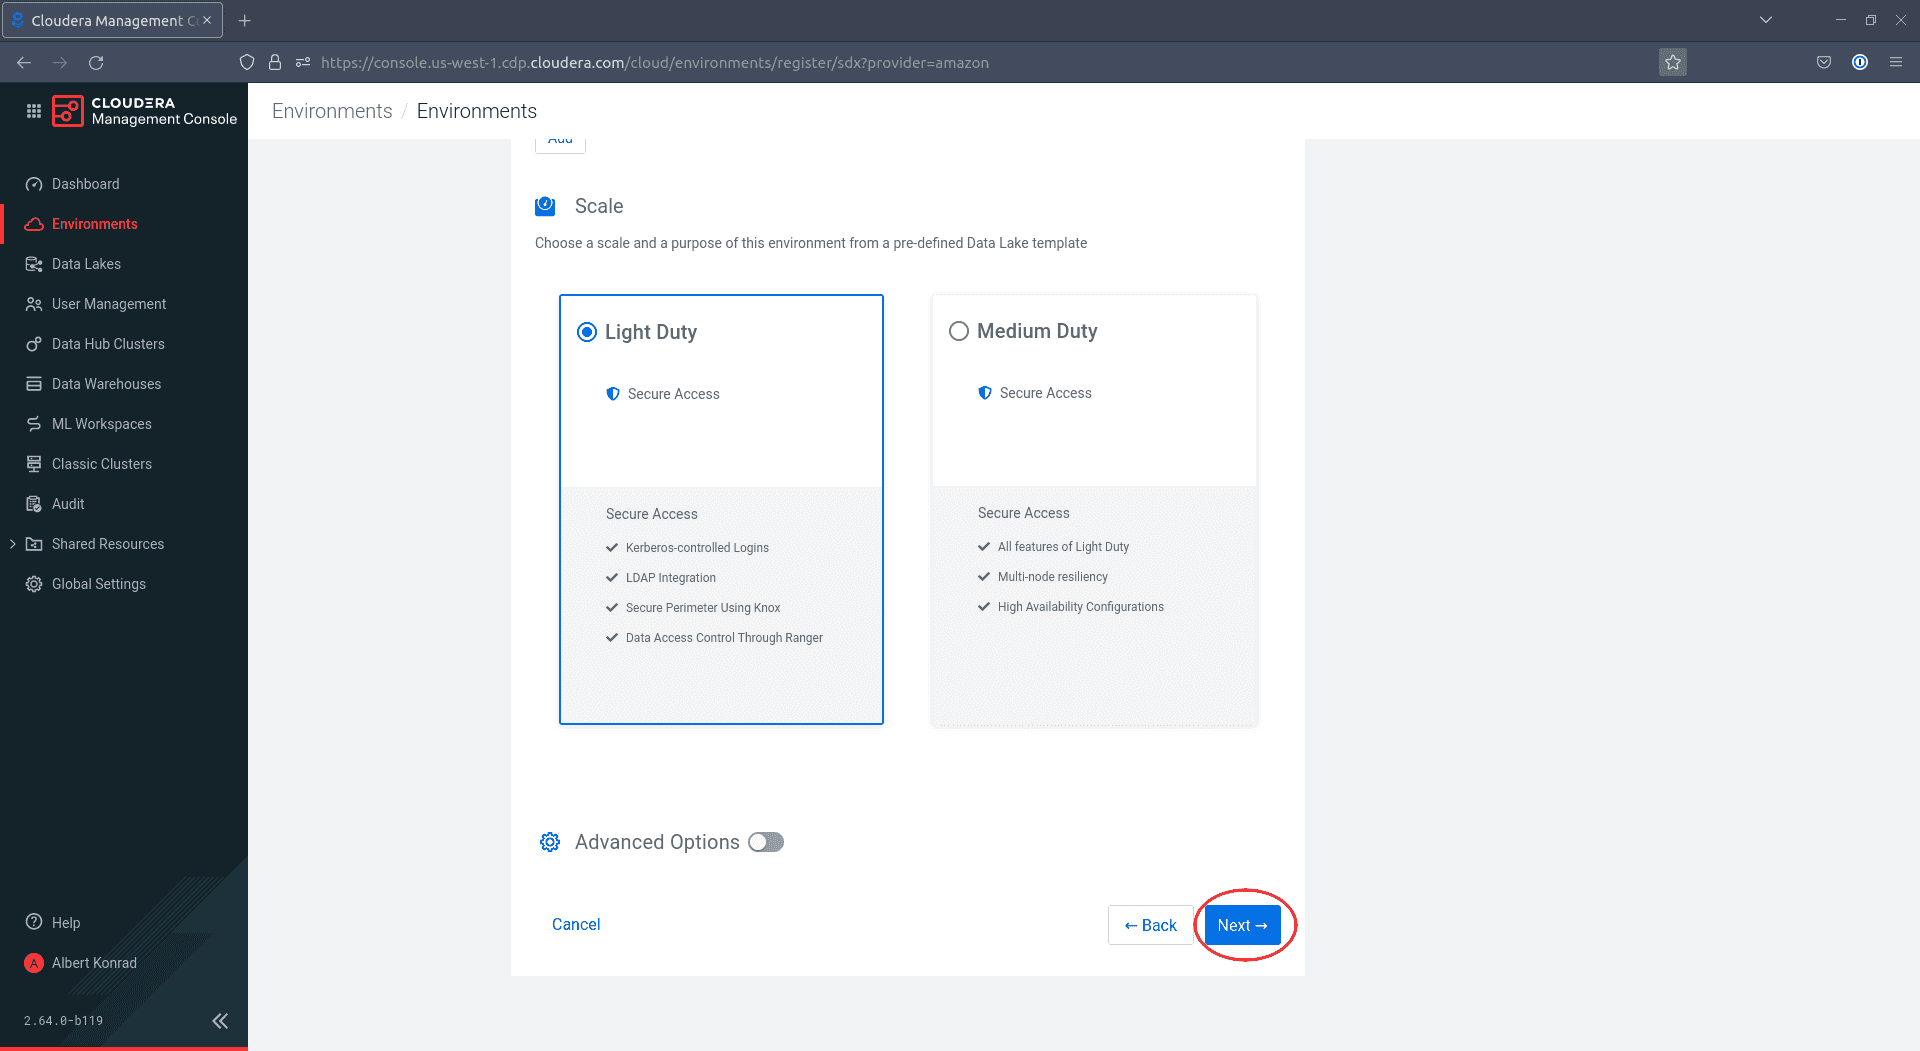
Under Scale, select the desired configuration of your data lake.
Light Dutyshould be sufficient for our use case. Click Next.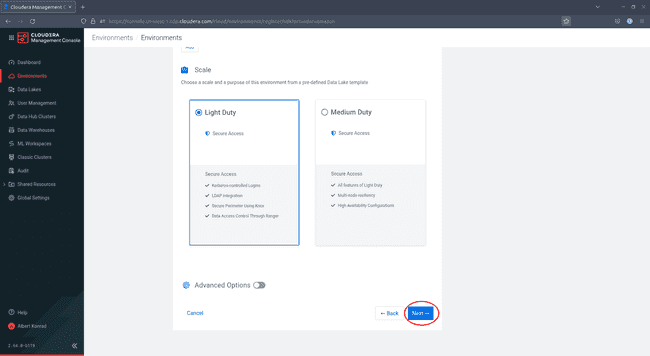
-
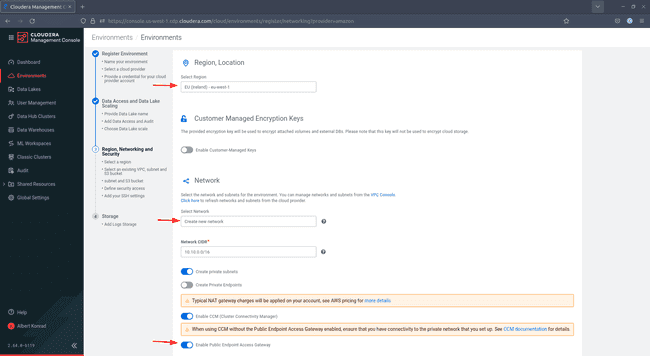
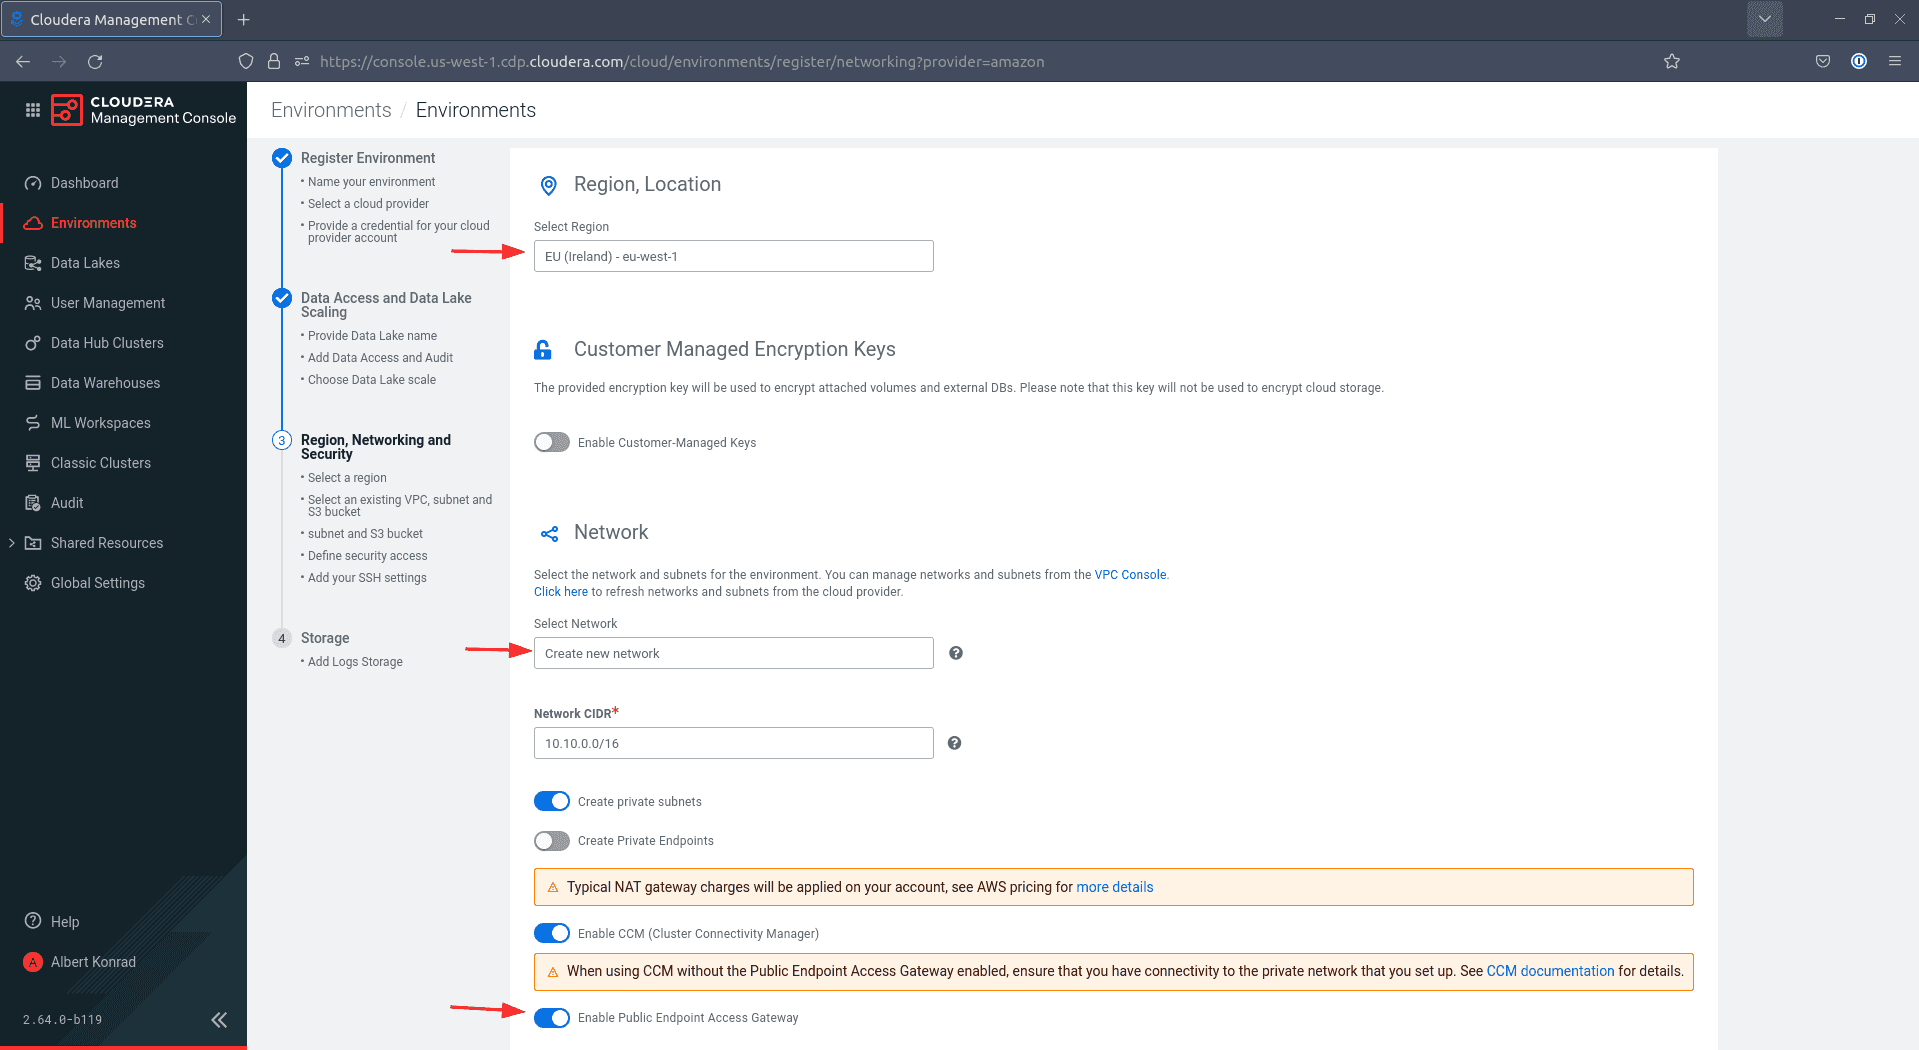
In Region, Networking and Security, apply the following configuration:
-
Region: Select the AWS region you created your stack in
-
Network: Select Create new network
-
Be sure to enable Public Endpoint Access Gateway
-
-
Leave the proxy configuration at the default setting
Do not use Proxy Configuration. -
Under Security Access Settings, leave the default setting
Create New Security Groupswith an access CIDR of0.0.0.0/0. -
In SSH Settings, choose
Existing SSH public keyand select the key you created earlier from the drop down.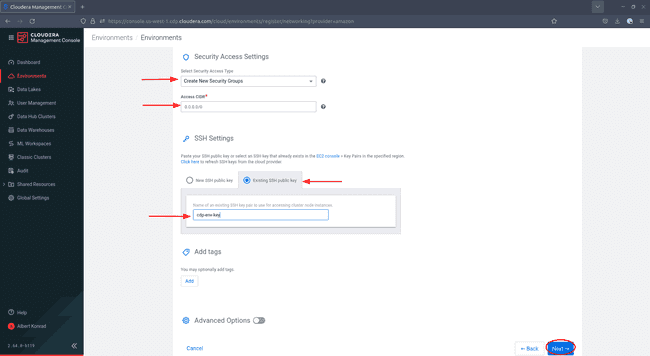
-
Optionally add some tags. These tags are applied to all AWS resources created by this step. We recommend to always tag your resources for easier monitoring and deletion. When done, click Next.
-
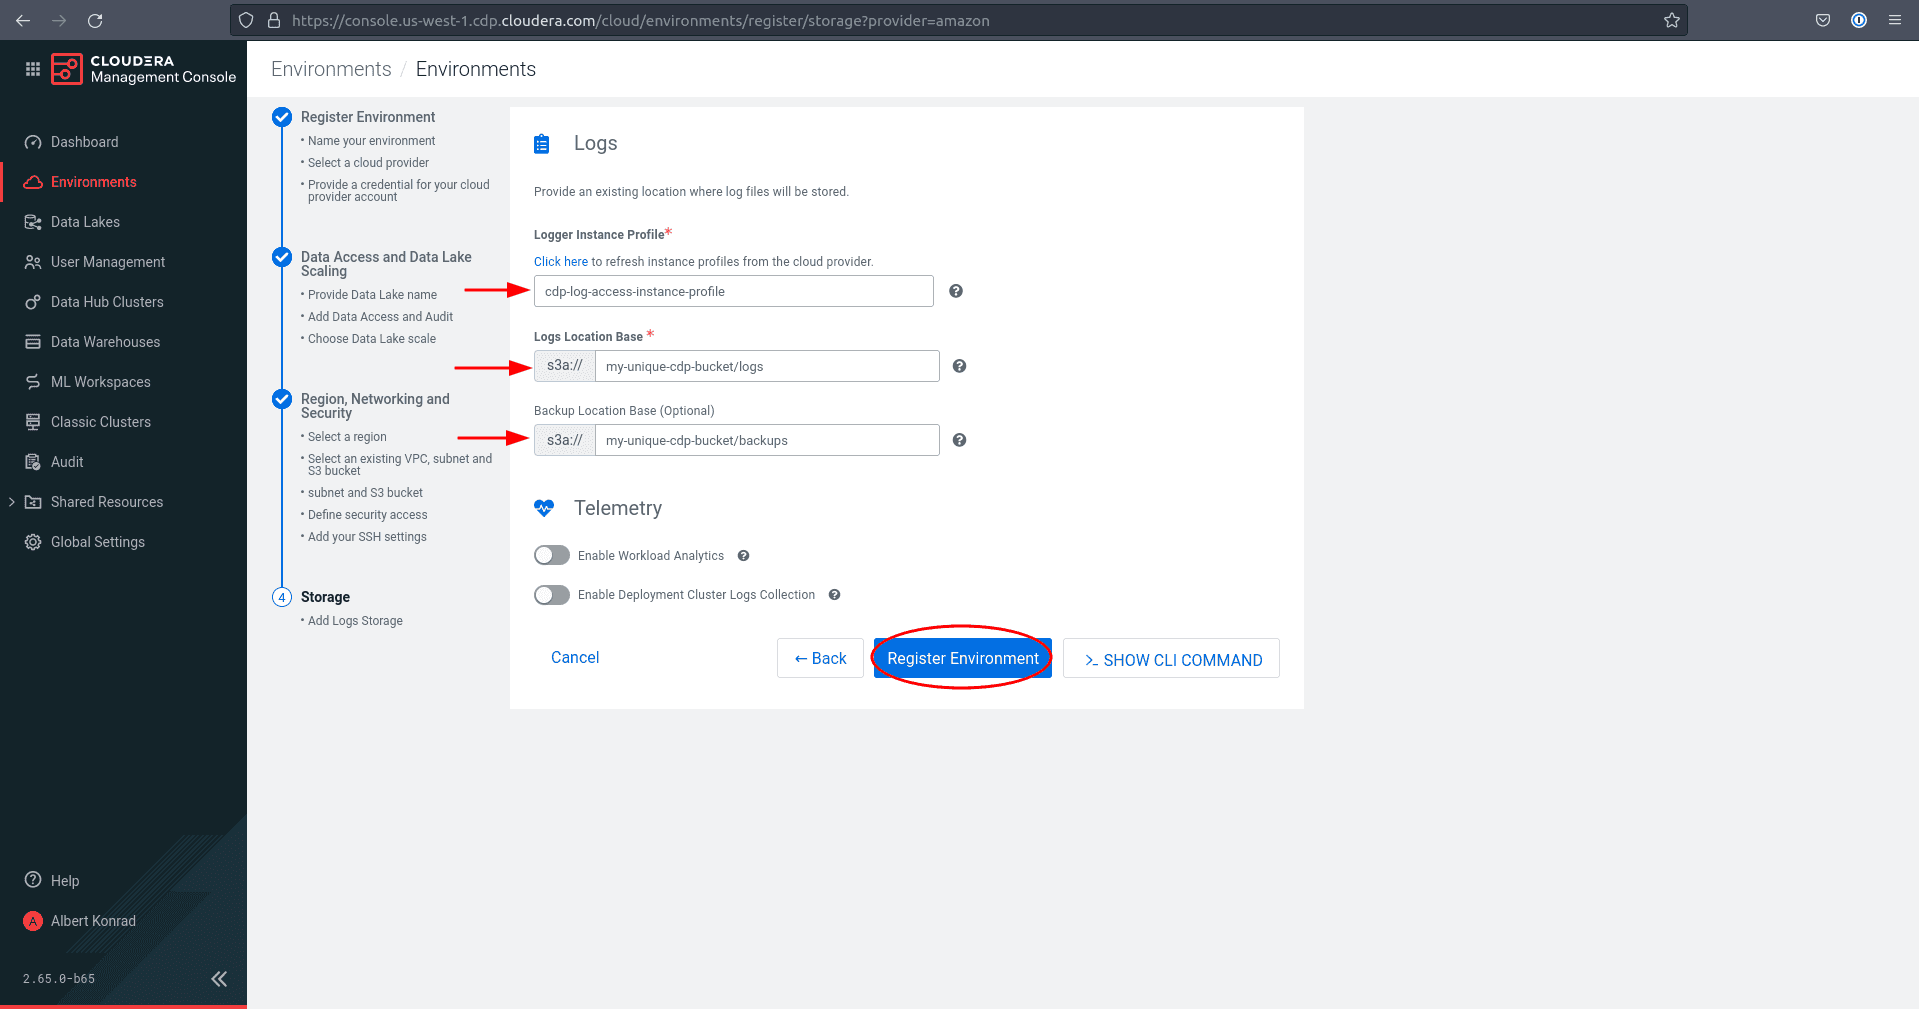
Under Logger Instance Profile enter the
[YOUR-PREFIX]-log-access-instance-profileas well as the log and backup location base created in your stack. Check your CloudFormation console for the correct parameters in case you are not sure.
-
Click Register Environment to start the environment creation.


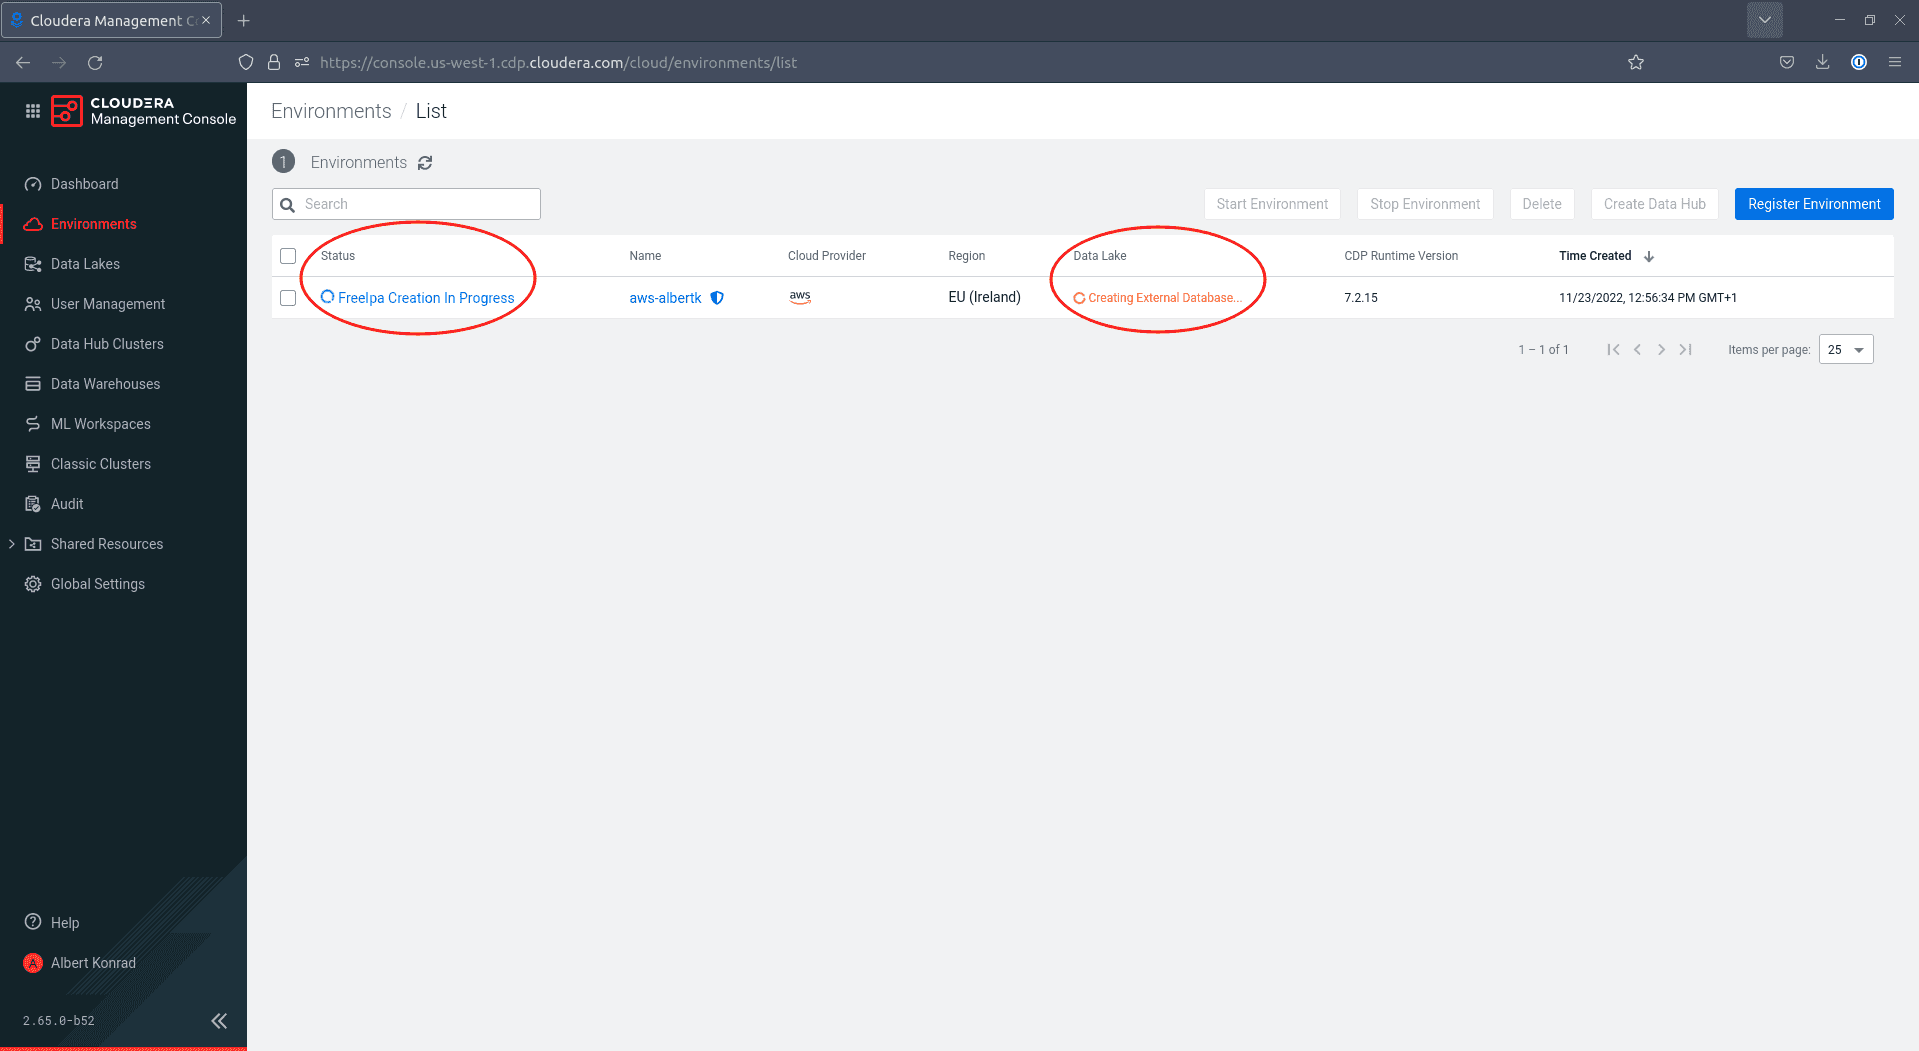
And that’s it! You have now launched the deployment of a CDP Public Cloud environment on AWS. Monitor your progress via the Cloudera console:
Remove your CDP Environment
As soon as you no longer use your environment, you should remove it from AWS to avoid incurring unwanted costs. Note that your base stack and the S3 bucket you created via CloudFormation remain, so that you may re-deploy your environment later starting from Register a CDP Environment in AWS.
To delete your environment via the Cloudera console:
-
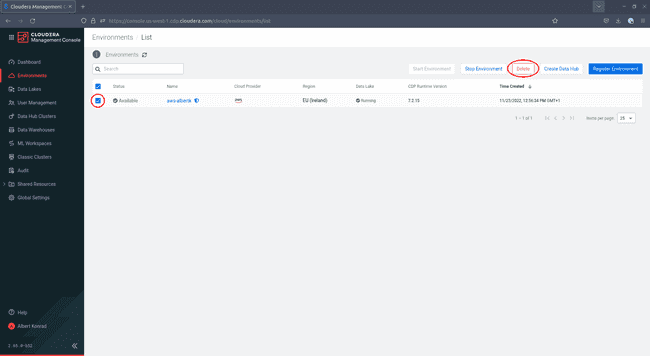
Navigate to Environments in the Cloudera Management Console. Tick the checkbox next to the environment you want to delete and click Delete Environment:
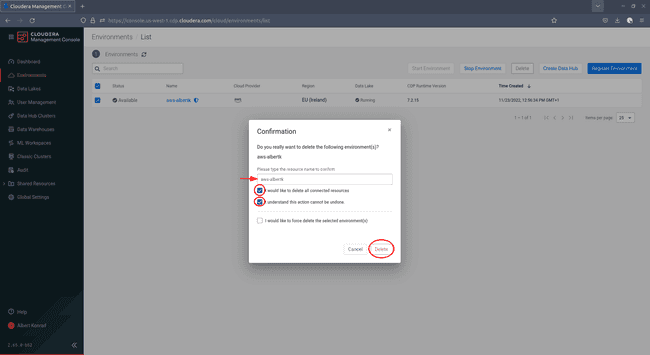
-
In the Confirmation dialog, enter the name of the resource you want to delete and tick the first two boxes, then click Delete:


Be aware that there is a chance that the environment deletion process does not complete successfully. Always double check in your AWS console that all resources managed by CDP have been removed from your account. You can use the CloudFormation service or AWS resource tags (if you configured them during deployment) to look for CDP managed resources.
Deploy from the Terminal
Deploying via the terminal is recommended for experienced users who want to launch their environment quickly. You need to have the CDP CLI and the AWS CLI installed on your system as described in the first part of the series. jq is also required for the below commands to work.
The order of operations is the same as if you deployed via the web interface: First, create a credential (which requires the use of the web interface), then create your CloudFormation stack and SSH key pair before you launch your environment.
Register Your CDP Credential
Use the web interface to create a Cross-account access role in your AWS account as described above. Follow the steps up to the point where you copy the ARN of the newly created role, then register it in CDP with the following command:
# Set your AWS Role ARN
export CDP_AWS_CROSS_ACCOUNT_ROLE_ARN=[your-role-arn]
# Register your CDP credential
export CDP_CREDENTIAL_NAME=${USER}-aws-credential
export CDP_CREDENTIAL_DESC="CDP AWS credential by ${USER}"
cdp environments create-aws-credential \
--credential-name ${CDP_CREDENTIAL_NAME} \
--role-arn ${CDP_AWS_CROSS_ACCOUNT_ROLE_ARN} \
--description "${CDP_CREDENTIAL_DESC}"There is no immediate feedback if you successfully created your credential. To validate that your credential was created use this command:
# Check the existance of a CDP credential
cdp environments list-credentials \
  --credential-name=${CDP_CREDENTIAL_NAME}
Create a CloudFormation Stack
The next step in the deployment process is the creation of a CloudFormation stack. To create the stack via the AWS CLI based on the template provided by Cloudera, use the following commands:
# Download and save the template
curl \
  -o ~/aws-cdp-template.json \
  https://docs.cloudera.com/cdp-public-cloud/cloud/quickstart-files/cloud-formation-setup.json
# Set additional environment variables
export CDP_BASE_STACK_NAME=aws-${USER}-env
export CDP_RESOURCE_PREFIX=cdp
export AWS_S3_BUCKET=cdp-${USER}-$RANDOM
export AWS_S3_BUCKET_DATA=${AWS_S3_BUCKET}/data
export AWS_S3_BUCKET_LOGS=${AWS_S3_BUCKET}/logs
export AWS_S3_BUCKET_BACKUPS=${AWS_S3_BUCKET}/backups# Optionally set a region. If not set, the next command defaults to eu-west-1.
export AWS_REGION=eu-west-1# Create your AWS CloudFormation stack
aws cloudformation deploy \
--template-file ~/aws-cdp-template.json \
--stack-name ${CDP_BASE_STACK_NAME} \
--parameter-overrides \
StorageLocationBase=${AWS_S3_BUCKET_DATA} \
LogsLocationBase=${AWS_S3_BUCKET_LOGS} \
BackupLocationBase=${AWS_S3_BUCKET_BACKUPS} \
prefix=${CDP_RESOURCE_PREFIX} \
--region ${AWS_REGION:-eu-west-1} \
--capabilities CAPABILITY_NAMED_IAMThe progress of the stack creation process is displayed in your terminal.
Create an SSH Key Pair
You need to provide a SSH Key Pair when you register your environment. Use these commands to create a new key pair:
# Set a name for your key pair
export AWS_SSH_KEY=aws-cdp-${USER}
# Create the key pair & download the file
aws ec2 create-key-pair \
--key-name ${AWS_SSH_KEY} \
--output text > /home/${USER}/.ssh/${AWS_SSH_KEY}.pem \
--region ${AWS_REGION:-eu-west-1} \
&& chmod 400 /home/${USER}/.ssh/${AWS_SSH_KEY}.pemThere is no feedback if you successfully created your key pair. Use this command to validate if the operation was successful:
aws ec2 describe-key-pairs \
  --key-name {$AWS_SSH_KEY} \
  --region ${AWS_REGION:-eu-west-1}
Launch your Environment and Data Lake
With all the setup done, you are now ready to launch your CDP Public Cloud Environment and Data Lake. This requires three steps that are to be executed in order:
- Create the base CDP environment
- Configure ID broker mappings
- Create the data lake itself
Before we begin, let’s ensure all environment variables are available in the current shell session:
# CDP resource naming
export CDP_ENV_NAME=aws-${USER}
export CDP_DATALAKE_NAME=aws-${USER}-datalake
export CDP_RESOURCE_PREFIX=$(aws cloudformation describe-stacks \
  --stack-name ${CDP_BASE_STACK_NAME:-aws-${USER}-env} \
  | jq -r '.Stacks[].Parameters[] | select (.ParameterKey=="prefix").ParameterValue')
export AWS_S3_BUCKET=$(aws cloudformation describe-stacks \
  --stack-name ${CDP_BASE_STACK_NAME:-aws-${USER}-env} \
  | jq -r '.Stacks[].Parameters[] | select(.ParameterKey=="StorageLocationBase").ParameterValue' \
  | grep -Po '[a-z0-9-]*(?=/)')
export AWS_S3_BUCKET_DATA=${AWS_S3_BUCKET}/data
export AWS_S3_BUCKET_LOGS=${AWS_S3_BUCKET}/logs
export AWS_S3_BUCKET_BACKUPS=${AWS_S3_BUCKET}/backups

# AWS resource roles and instance profiles
export AWS_ACCOUNT_ID=$(aws sts get-caller-identity | grep -Po "(?<=\"Account\": \")[0-9]*")
export AWS_LOG_ACCESS_INSTANCE_PROFILE_ARN=arn:aws:iam::${AWS_ACCOUNT_ID}:instance-profile/${CDP_RESOURCE_PREFIX}-log-access-instance-profile
export AWS_DATA_ADMIN_ROLE_ARN=arn:aws:iam::${AWS_ACCOUNT_ID}:role/${CDP_RESOURCE_PREFIX}-datalake-admin-role
export AWS_DATA_ADMIN_INSTANCE_PROFILE_ARN=arn:aws:iam::${AWS_ACCOUNT_ID}:instance-profile/${CDP_RESOURCE_PREFIX}-data-access-instance-profile
export AWS_RANGER_AUDIT_ROLE_ARN=arn:aws:iam::${AWS_ACCOUNT_ID}:role/${CDP_RESOURCE_PREFIX}-ranger-audit-role

# AWS resource tagging
export AWS_TAG_GENERAL_KEY=ENVIRONMENT_PROVIDER
export AWS_TAG_GENERAL_VALUE=CLOUDERA
export AWS_TAG_SERVICE_KEY=CDP_SERVICE
export AWS_TAG_SERVICE_ENVIRONMENT=CDP_ENVIRONMENT
export AWS_TAG_SERVICE_DATALAKE=CDP_DATALAKE
Now we begin by creating our AWS environment:
# Create the base environment
cdp environments create-aws-environment \
  --environment-name ${CDP_ENV_NAME:-aws-${USER}} \
  --credential-name ${CDP_CREDENTIAL_NAME:-${USER}-aws-credential} \
  --region ${AWS_REGION:-eu-west-1} \
  --security-access cidr=${CDP_SECURITY_ACCESS:-0.0.0.0/0} \
  --tags key=${AWS_TAG_GENERAL_KEY},value=${AWS_TAG_GENERAL_VALUE} key=${AWS_TAG_SERVICE_KEY},value=${AWS_TAG_SERVICE_ENVIRONMENT} \
  --endpoint-access-gateway-scheme ${CDP_GATEWAY_SCHEME:-PUBLIC} \
  --enable-tunnel \
  --authentication publicKeyId=${AWS_SSH_KEY:-aws-cdp-${USER}} \
  --log-storage storageLocationBase=s3a://${AWS_S3_BUCKET_LOGS},backupStorageLocationBase=s3a://${AWS_S3_BUCKET_BACKUPS},instanceProfile=${AWS_LOG_ACCESS_INSTANCE_PROFILE_ARN} \
  --network-cidr ${AWS_NETWORK_CIDR:-10.10.0.0/16} \
  --create-private-subnets \
  --no-create-service-endpoints \
  --free-ipa instanceCountByGroup=${CDP_IPA_INSTANCE_COUNT:-2}
Next, we set our ID broker mappings:
# Configure ID broker mappings
cdp environments set-id-broker-mappings \
  --environment-name ${CDP_ENV_NAME:-aws-${USER}} \
  --data-access-role ${AWS_DATA_ADMIN_ROLE_ARN} \
  --ranger-audit-role ${AWS_RANGER_AUDIT_ROLE_ARN} \
  --set-empty-mappings
And finally, we create the data lake:
# Create a data lake
cdp datalake create-aws-datalake \
  --datalake-name ${CDP_DATALAKE_NAME:-aws-${USER}-datalake} \
  --environment-name ${CDP_ENV_NAME:-aws-${USER}} \
  --cloud-provider-configuration instanceProfile=${AWS_DATA_ADMIN_INSTANCE_PROFILE_ARN},storageBucketLocation=s3a://${AWS_S3_BUCKET_DATA} \
  --tags key=${AWS_TAG_GENERAL_KEY},value=${AWS_TAG_GENERAL_VALUE} key=${AWS_TAG_SERVICE_KEY},value=${AWS_TAG_SERVICE_DATALAKE} \
  --scale ${CDP_DATALAKE_SCALE:-LIGHT_DUTY} \
  --runtime ${CDP_DATALAKE_RUNTIME:-7.2.15} \
  --no-enable-ranger-raz
Monitor your environment and data lake status with the following commands:
# Check the status of the environment
cdp environments describe-environment \
  --environment-name ${CDP_ENV_NAME:-aws-${USER}} \
  | jq -r '.environment.status'
# Check the status of the data lake
cdp datalake describe-datalake \
--datalake-name ${CDP_DATALAKE_NAME:-aws-${USER}} \
| jq -r '.datalake.status'If deployed successfully, your environment status is AVAILABLE, and your data lake status is RUNNING.
Teardown your Resources
Once you no longer use your environment, it is highly recommended that you remove your AWS resources in order to avoid unwanted cost. Issue the following command to delete your environment and all associated resources:
# Delete a CDP environment and all related resources
cdp environments delete-environment \
  --environment-name ${CDP_ENV_NAME:-aws-${USER}} \
  --cascading
Be sure to always validate that your resources have been deleted completely. The best way to verify that all resources have been removed is to check your AWS CloudFormation Console.
Resources and Costs
While Cloudera’s CDP Public Cloud documentation is extensive, determining which resources are created as part of your deployment is not a trivial task. Based on our observations the deployment we describe in this article - with a Light Duty configuration for the Data Lake - creates the following resources:
Hourly and other costs are for the
EU Ireland region, as observed in June 2023. AWS resource pricing varies by region and can change over time. Consult AWS Pricing to see the current pricing for your region.
| CDP Component | AWS Resource Created | Resource Count | Resource Cost (Hour) | Resource Cost (Other) |
|---|---|---|---|---|
| Base* | S3: Bucket | 1 | n/a | AWS S3 Pricing |
| Base | IAM: Role | 4 | No charge | No charge |
| Base | IAM: Instance Profile | 2 | No charge | No charge |
| Base | IAM: Managed Policy | 6 | No charge | No charge |
| Base | CloudFormation: Stack | 1 | No charge | Handling costs |
| Environment | EC2 Instance: m5.large | 2 | $0.107 | Data Transfer Cost |
| Environment | EC2: Elastic IP Address | 3 | $0.005** | No charge |
| Environment | EC2: EBS - GP2 100gb | 2 | n/a | $0.11 per GB Month (see EBS pricing) |
| Environment | EC2: Security Group | 1 | No charge | No charge |
| Environment | VPC: NAT Gateway | 3 | $0.048 | $0.048 per GB processed (see VPC pricing) |
| Environment | VPC: Internet Gateway | 1 | No charge | No charge |
| Environment | VPC: Route Table | 4 | No charge | No charge |
| Environment | VPC: Subnet Group | 6 | No charge | No charge |
| Environment | VPC: Virtual Private Cloud | 1 | No charge | No charge |
| Environment | CloudFormation: Stack | 2 | No charge | Handling costs |
| Data Lake | EC2 Instance: t3.medium | 1 | $0.0456 | Data Transfer Cost |
| Data Lake | EC2 Instance: r5.2xlarge | 1 | $0.564 | Data Transfer Cost |
| Data Lake | RDS Postgre DB Instance: db.m5.large | 1 | $0.197 | Additional RDS charges |
| Data Lake | RDS DB Snapshot | 1 | n/a | DB Snapshot Export charges |
| Data Lake | EC2 EBS - GP2 100gb | 2 | n/a | $0.11 per GB Month (see EBS pricing) |
| Data Lake | EC2 EBS - GP2 512gb | 1 | n/a | $0.11 per GB Month (see EBS pricing) |
| Data Lake | EC2: Network Load Balancer | 2 | $0.0252 | 0.006$ per NCLU hour |
| Data Lake | EC2: Network Target Groups | 2 | No charge | No charge |
| Data Lake | EC2: Security Group | 3 | No charge | No charge |
| Data Lake | RDS: DBSubnetGroup | 1 | No charge | No charge |
| Data Lake | CloudFormation: Stack | 2 | No charge | Handling costs |
* Base refers to the AWS resources created on your account by the initial CloudFormation stack. These resources remain on your account even if the deployment is deleted until you remove the stack.
** Per running EC2 instance, one Elastic IP Address is free of charge
Not accounting for costs that scale with usage, such as data transfer costs, and monthly costs that are pro-rated on an hourly basis, such as EBS storage costs, this basic deployment has an hourly cost of approximately $1.17.
Next step: activate Data Services
Of course, there is not much you can do yet with your brand new CDP Public Cloud environment. In order to completely deploy and use our end-to-end architecture, we’ll in the next chapter see how to activate managed Data Services.
