CDP part 1: introduction to end-to-end data lakehouse architecture with CDP
By Stephan BAUM
Jun 8, 2023
Never miss our publications about Open Source, big data and distributed systems, low frequency of one email every two months.
Cloudera Data Platform (CDP) is a hybrid data platform for big data transformation, machine learning and data analytics. In this series we describe how to build and use an end-to-end big data architecture with Cloudera CDP Public Cloud on Amazon Web Services (AWS).
Our architecture is designed to retrieve data from an API, store it in a data lake, move it to a data warehouse and eventually serve it in a data visualization application to analytics end users.
This series includes the following six articles:
- CDP part 1: introduction to end-to-end data lakehouse architecture with CDP
- CDP part 2: CDP Public Cloud deployment on AWS
- CDP part 3: Data Services activation on CDP Public Cloud environment
- CDP part 4: user management on CDP Public Cloud with Keycloak
- CDP part 5: user permission management on CDP Public Cloud
- CDP part 6: end-to-end data lakehouse usecase with CDP
Architectural considerations
The purpose of our architecture is to support a data pipeline that allows the analysis of variations in the stock price of multiple companies. We are going to retrieve data, ingest it into a data warehouse and eventually plot it on charts to visually gain insights.
This architecture requires the following capabilities:
-
We need an application that extracts the stock data from a web API and stores it in a cloud provider’s storage solution.
-
We also need the ability to run jobs that transform the data and load it into a data warehouse.
-
The data warehouse solution must be able to store the incoming data and support querying with SQL syntax. Also, we want to make sure we can use the modern Apache Iceberg table format.
-
Finally, we use the analytics service natively present in the Cloudera platform.
With this in mind, let’s take a closer look at what CDP offers.
CDP Architecture
Every CDP Account is associated with a control plane, a shared infrastructure that facilitates the deployment and operation of CDP Public Cloud services. Cloudera offers control planes in three regions: us-west-1 hosted in the USA, eu-1 located in Germany, and ap-1 based in Australia. At the time of writing, us-west-1 is the only region in which all data services are available. The official CDP Public Cloud documentation lists available services per region.
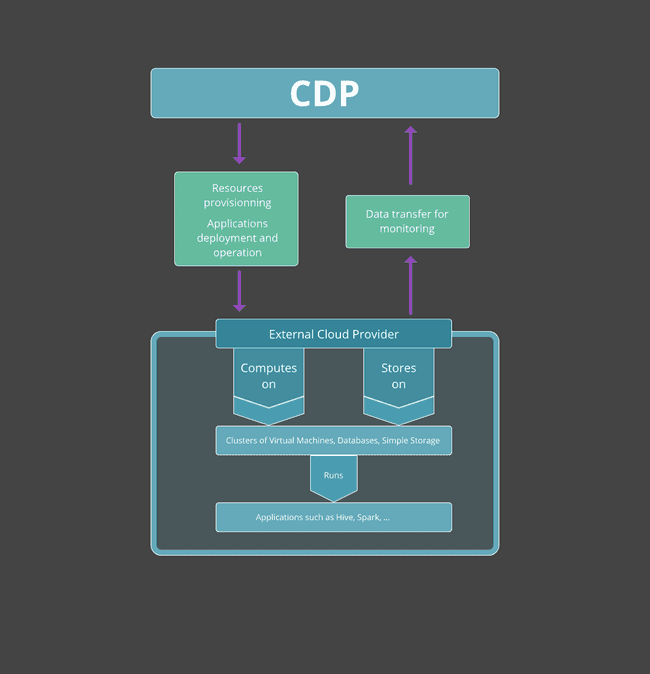
CDP does not host data or perform computations. In the case of a public cloud deployment, CDP uses the infrastructure of an external cloud provider - AWS, Azure, or Google Cloud - to perform computations and store data for its managed services. CDP also allows users to create private cloud deployments on on-premises hardware or using cloud infrastructure. In the latter case, Cloudera provides the Cloudera Manager application that is hosted on your infrastructure to configure and monitor the core private cloud clusters. In this and subsequent articles, we will focus exclusively on a public cloud deployment with AWS.
CDP Public Cloud allows users to create multiple environments hosted on different cloud providers. An environment groups virtual machines and virtual networks on which managed CDP services are deployed. It also holds user configurations such as user identities and permissions. Environments are independent of each other: a CDP user can run multiple environments on the same cloud provider or multiple environments on different cloud providers.
However it has to be said that some CDP services are not available on all cloud providers. For example, at the time of writing only environments hosted on AWS allow the CDP Data Engineering service to use Apache Iceberg tables.
The schema below describes the relationship between CDP and the external cloud provider:
CDP Services
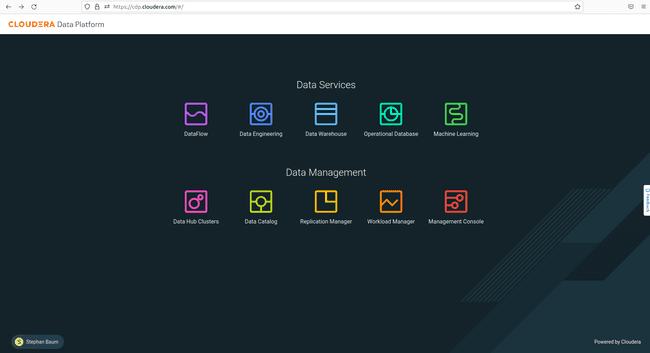
The below image shows the landing page of the CDP Console, the web interface of the platform, in the us-west-1 region:
The left-to-right order of the services displayed in the console is logical as it follows the pipeline process. The DataFlow service extracts data from various sources, while the Data Engineering service handles data transformations. The Data Warehouse or Operational Database services stores ready-to-use data, and finally, the Machine Learning service allows data scientists to perform artificial intelligence (AI) tasks on the data.
Let’s describe the services in more detail, with a focus on the ones we use in our end-to-end architecture.
DataFlow
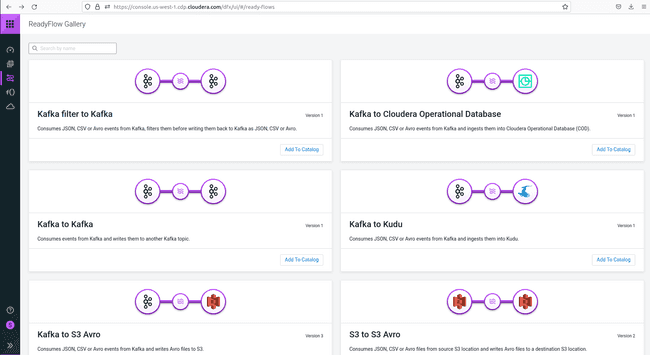
This service is a streaming application that allows users to pull data from various sources and place it in various destinations for staging, like an AWS S3 bucket, while using triggers. The underlying component of this service is Apache NiFi. All data streams created by users are stored in a catalog. Users may choose from the available flows and deploy them to an environment. Some ready-made flows for specific purposes are stored in the ReadyFlow gallery which is shown below.
DataFlow is either activated as a “deployment”, which creates a dedicated cluster on your cloud provider, or in a “functions” mode that makes use of serverless technologies (AWS Lambda, Azure Functions or Google Cloud Functions).
Data Engineering
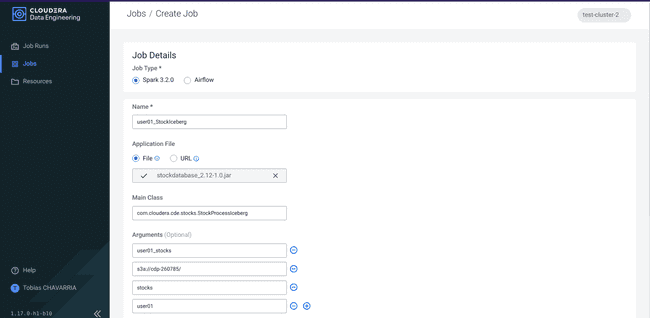
This service is the core extract, transform and load (ETL) component of CDP Public Cloud. It performs the automatic orchestration of a pipeline by ingesting and processing data to make it usable for any subsequent use. It takes data from a staging area by the DataFlow service and runs Spark or AirFlow jobs. In order to use this service, users need to enable it and create a virtual cluster where these orchestration jobs can run. The service also requires virtual machines and database clusters in your external cloud provider.
Data Warehouse
This service allows users to create databases and tables and perform queries on the data using SQL. A warehouse holds data ready for analysis, and the service includes a Data Visualization feature. Users need to enable the Data Warehouse service for their environment and create a so-called “virtual data warehouse” to handle analytical workloads. These actions create Kubernetes clusters and a filesystem storage (EFS in the case of AWS) on the external cloud provider.
Operational Database
This service creates databases for dynamic data operations and is optimized for online transactional processing (OLTP). This distinguishes it from the Data Warehouse service, which is optimized for online analytical processing (OLAP). Since we don’t need OLTP capabilities, we’re not going to use the Operational Database service, and so we won’t discuss it further. You will find more about the difference between OLTP and OLAP processing in our article on the different file formats in big data and more about the Operational Datastore in the official Cloudera documentation.
Machine Learning
CDP Machine Learning is the tool used by data scientists to perform estimations, classifications and other AI-related tasks. We have no need for machine learning in our architecture and therefore we’re not going into more detail on this service. For any additional information refer to the Cloudera website.
Our Architecture
Now that we’ve had a look at the services offered by CDP, the following architecture emerges:
-
Our CDP Public Cloud environment is hosted on AWS as this is currently the only option that supports Iceberg tables.
-
Data is ingested using CDP DataFlow and stored in a data lake built on Amazon S3.
-
Data processing is handled by Spark jobs that run via the Data Engineering service.
-
Processed data is loaded into a Data Warehouse and ultimately served via the built-in Data Visualization feature.
The next two articles configure the environment. Then, you will learn how to manage users and their permissions. Finally, we create the data pipeline.
Follow along: Prerequisites
If you want to follow along as we progress in our series and deploy our end-to-end architecture yourself, certain requirements need to be met.
AWS resource needs and quotas
As described in the previous sections, each CDP service provisions resources from your external cloud provider. For example, running all the required services deploys a small fleet of EC2 instances with many virtual CPUs across them.
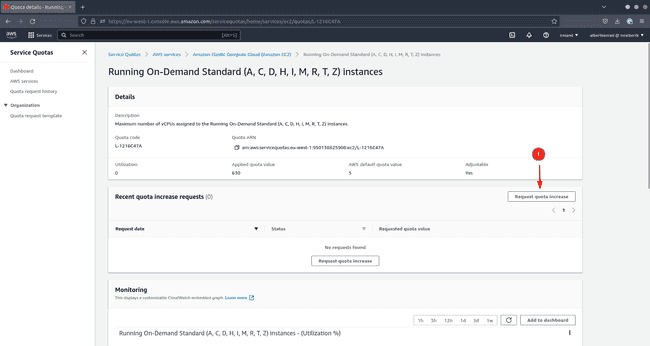
In consequence, you need to pay attention to the service quota Standard Instance Run on Demand (A, C, D, H, I, M, R, T, Z). This quota governs how many virtual CPUs you may provision simultaneously.
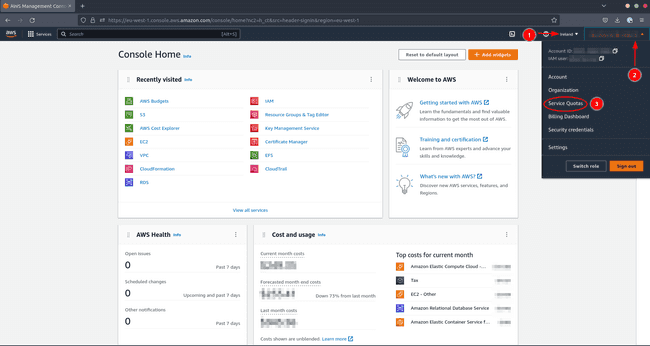
To verify if your quota is high enough and to increase it if necessary, do the following in your AWS console:
- Navigate to the region where you want to create the resources
- Click on your user name
- Click on Service Quotas
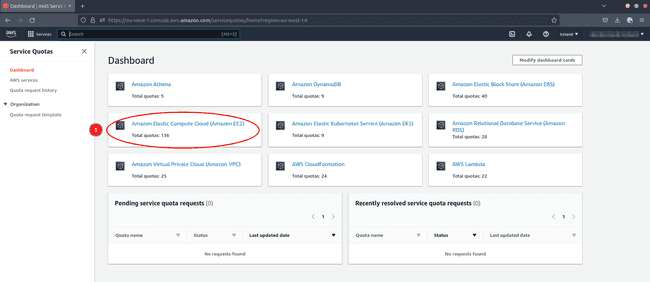
Now let’s look at the quotas for EC2
- Click on Amazon Elastic Compute Cloud (Amazon EC2)
To check the relevant quota limiting your vCPU usage:
- Type
Running On-Demand Standard (A, C, D, H, I, M, R, T, Z) instances - Check that the number of virtual CPUs is over 300 to be safe
If the quota is too restrictive, request an increase. This request can take more than 24 hours to be granted.
- Click on the name of the quota (action 3 in the screenshot above)
- Click on Request quota increase to request an increase
Other external cloud providers also have quotas for the creation of virtual machines. If you find yourself in a situation where you want to add CDP managed services to an environment and the operation fails, it is always worth checking if quotas are the culprit.
Keep in mind that these quotas are set for budget security reasons. Using more resources will result in a higher bill. Be aware that following the steps outlined in this series of articles will create resources on your AWS account, and these resources will incur some cost for you. Whenever you practice with any cloud provider, be sure to research these costs in advance, and to delete all resources as soon as they are no longer needed.
AWS account permissions
You need to have access to an AWS user with at least administrator access to make the necessary configurations for a CDP Public Cloud deployment. This user account can only be configured by a user with root access. Follow the official AWS documentation to manage user permissions accordingly.
CDP account registration
You also need to have access to a Cloudera license and a user account with at least PowerUser privileges. If your organization has a Cloudera license, talk to an administrator to obtain access with the necessary level of privilege. Alternatively, you might want to consider signing up for a CDP Public Cloud trial.
AWS and CDP command-line interfaces
If you are not comfortable with CLI commands, the series also show all tasks being performed via the web interfaces provided by Cloudera and AWS. That said, you might choose to install the AWS and CDP CLI tools on your machine. These tools allow you to deploy environments and to enable services in a faster and more reproductible manner.
Install and configure the AWS CLI
The AWS cli installation is explained in the AWS documentation.
If you happen to use NixOS or the Nix package manager, install the AWS CLI via the Nix packages website.
To configure the AWS CLI, you need to retrieve the access key and secret access key of your account as explained in the AWS documentation. Then run the following command:
aws configureProvide your access key and secret access key, the region where you want to create your resources, and be sure to select json as Default output format. You are now ready to use AWS CLI commands.
Install and configure the CDP CLI
CDP CLI uses python 3.6 or later and requires pip to be installed on your system. The Cloudera documentation guides you through the client installation process for your operating system.
If you happen to use use NixOS or a Nix package manager, we recommend you to first install the virtualenv package and then follow the steps for the Linux operating system.
Run the following code to verify that CLI is working:
cdp --versionAs with the AWS CLI, the CDP CLI requires an access key and a secret access key. Log into the CDP Console to retrieve those. Note that you need the PowerUser or IAMUser role in CDP to perform the tasks below:
-
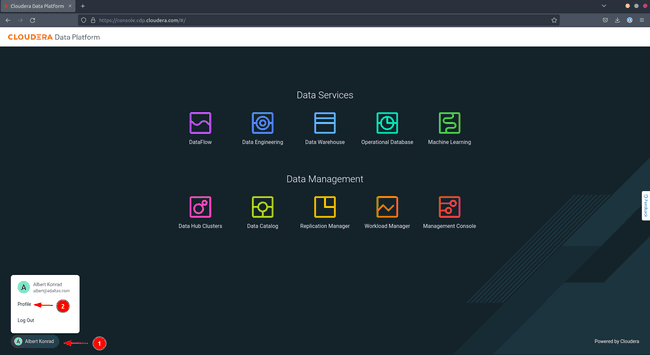
Click on your user name in the bottom left corner, then select Profile
-
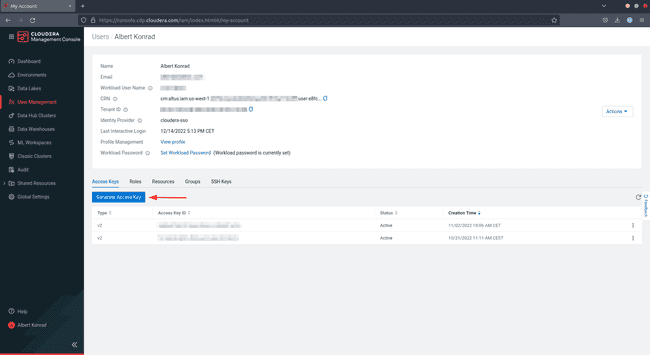
On the Access Keys tab, click on Generate Access Key
-
CDP creates and displays the information on the screen. Now either download and save the credentials in
~/.cdp/credentialsdirectory or run the commandcdp configurewhich creates the file for you.
To confirm success run the following code. You should get a similar output as shown below:
cdp iam get-userNow that everything is set up you are ready to follow along! In the next chapter of this series, we are going to deploy a CDP Public Cloud environment on AWS.
